Get started with cost accounting for supply chains in Dynamics 365 Finance
Cost accounting lets you collect data from various sources, such as the general ledger, sub-ledgers, budgets, and statistical information. You can then analyze, summarize, and evaluate cost data so that management can make the best possible decisions for price updates, budgets, cost control, and so on.
Prerequisites
- Basic understanding of finance and accounting processes
- Ability to use Finance for basic processing
- General understanding of order-to-cash scenarios
- General understanding of procure-to-pay scenarios
- General understanding of inventory and warehouse costing
- General understanding of manufacturing costing
Introduction
Cost accounting in Microsoft Dynamics 365 Finance lets you collect data from various sources, such as the general ledger, subledgers, budgets, and statistical information. Then, you can analyze, summarize, and evaluate cost data so that management can make the best possible decisions for price updates, budgets, cost control, and so on.
In this module, you'll learn how to get started with cost accounting in Finance. Additionally, you'll learn about the Cost control workspace and how to create a cost accounting report by using the Cost accounting Get started wizard.
The source data that's used for cost analysis is treated independently in cost accounting. Therefore, updates in cost accounting don’t affect the source data. However, when you collect cost data from various sources, and especially when you import the main accounts from General ledger in Finance as cost elements, data redundancy will occur because the same data exists in General ledger and Cost accounting. The data redundancy is required because you'll use financial management for external reporting and cost accounting for internal reporting.
Cost accounting process flow
The cost accounting process flow consists of setup, ongoing data imports, rules to perform allocations, and user reviews of resulting data. This module will focus on using data from Finance.
The Cost accounting Get started wizard is the best way to begin the setup. The wizard helps you prepare the cost accounting environment for use. You can run the wizard by going to the Cost accounting module, selecting the Setup group, and then selecting the Get started menu item.
Throughout each period, you can import data into the cost accounting ledger to compare actual data against the budget. The system keeps history for every import within the cost accounting ledger. A cost accounting administrator uses the Cost accounting ledger administration workspace to import data.
Data is reported against cost elements. Main accounts are the only cost element that Finance supports. Cost element dimensions play a role in data presentation and application of policies. You can create multiple cost element dimensions by limiting the range of main accounts that are allowed for each dimension. Use the Dimension hierarchies menu item to define hierarchies of values for each cost element. You can build as many hierarchies as you need.
Financial dimensions are set up as cost objects in cost accounting. Cost objects play an integral role in policy application and view of the data. Go to the Cost accounting module and select the Dimension group to set up dimensions. You can use the Cost object dimensions menu item to define cost objects and the Dimension hierarchies menu item to define hierarchies of values for each cost object.
You can define rules to modify the data from what is posted in the ledger. To do so, go to the Cost accounting module and select the Policies group to set up the rules. You can choose to perform allocations within Cost accounting and not within the General ledger. Cost accounting has its own ledger for reporting.
You can set up the system to limit the data that each user can view. Individual users can review their part of the data by using the Cost control workspace. You can export data to Microsoft Excel to perform detailed analyses. You can analyze data by using Microsoft Power BI and an entity from the entity store.
Cost accounting integration with other modules
Cost accounting works with two types of data: general ledger data and budget data. As such, the General ledger module and Budget module are involved with Cost accounting.
Financial data includes data from other modules within Dynamics 365. Customers, vendors, projects, products, item groups, fixed assets, and production orders are possible financial dimensions.
Next unit: Configure the Cost control workspace
Because Cost accounting analysis content highlights variances between the actual costs and budgeted costs, managers can be notified about positive and negative trends for their operational units. Managers can drill down to the cost element hierarchies or individual cost elements. In this way, managers can gain detailed insight into how cost variances have occurred, and then take effective action.
The Cost control workspace in Cost accounting > Cost control is designed as a page. Therefore, all managers who are responsible for a cost object can be granted access. The access to the page and data in the form can be controlled.
The list of reports that are available for users, such as managers, is controlled by the setting of the Published option on the Cost control workspace configurations page.
A manager can select the fiscal calendar period to view. The session date is used to determine the default current period.
The values in the fiscal calendar period are determined by the report name and the fiscal calendar that is selected for the cost accounting ledger that is associated with the report name on the Cost control workspace configurations page.
In the cost object dimension hierarchy, users can select the aggregation level at which balances should be shown. By enabling access-level security, you control the permissions so that users can view the entire hierarchy. However, users are only able to view balances for Chief Officers, such as the CEO and CFOs, who have been granted access.
Users can customize the columns on a report to fit their requirements.
View details
Users can drill into the details behind the balances that are shown in the workspace. If users select a cost element dimension hierarchy node, and then select View details, the Cost element details dialog box shows detailed information for the node.

A grid shows each cost element that is associated with the cost element dimension hierarchy node and its values. The columns that appear in the grid match the workspace settings. Two charts show a summary of actual versus budget and budget variance by period.
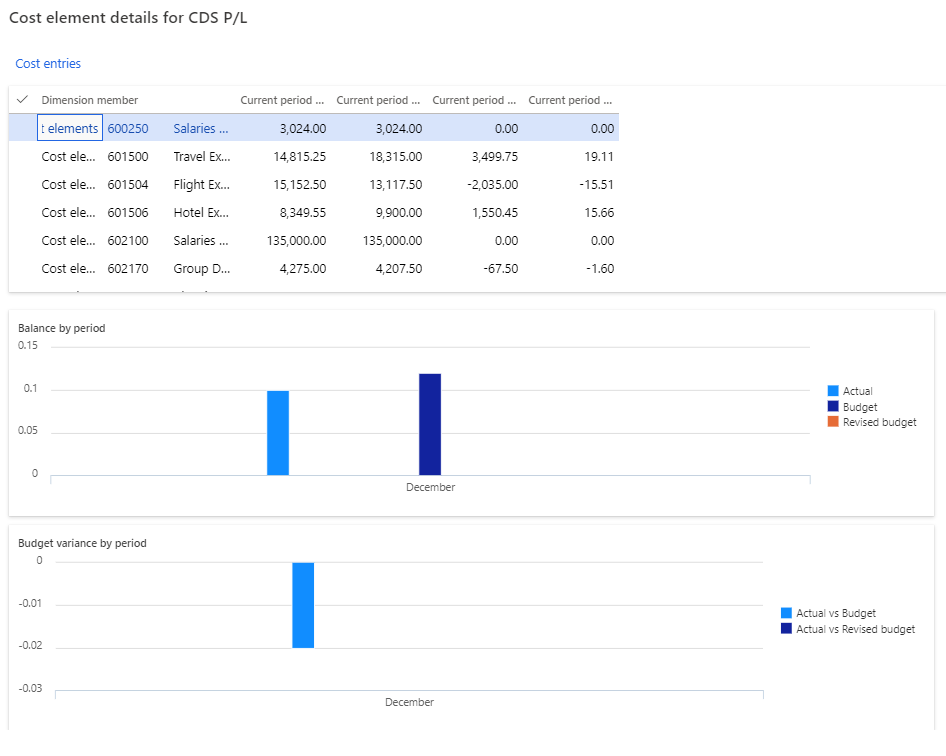
Users can select Cost entries to drill down into the entry details as required in Cost accounting > Cost control > View details > Cost entries.

For example, rent is an expenditure that is distributed to cost centers. A user who wants to understand the rent cost that his or her cost center must carry can drill down to view how rent has been calculated.
If users select Allocation base on the Cost entries page, a dialog box appears. Users can then assign the allocation base to the rule and view the corresponding statistical measures that are registered for the period.
In the following example, the allocation base is of the Formula allocation base type, and the formula is shown. The factors that define the formula are listed in Cost accounting > Cost control > View details > Cost entries > Allocation base. Additionally, a grid shows the calculation that is done per cost object.

Configure cost control workspace parameters
Use the following procedure to configure the Cost control workspace so that managers at various levels in an organization can gain insight into their cost objects, such as cost centers and product groups.
Go to Cost accounting > Setup > Cost control workspace configurations.
Select New.
In the Name field, type a value.
In the Description field, type a value.
Select Yes in the Published field.
If you set this option to Yes, users who are assigned one of these roles can view the report in the Cost control workspace: cost accounting manager, cost accountant, cost accountant clerk, or cost object controller.
If you set this option to No, only users who are assigned one of these roles can view the report in the Cost control workspace: cost accounting manager, cost accountant, or cost accountant clerk.
Expand the Data filtering section.
In the Cost control unit field, enter or select a value.
In the Budget original version field, enter or select a value.
In the Cost element dimension hierarchy field, enter or select a value.
In the Cost object dimension hierarchy field, enter or select a value.
Expand the Assign calculation records section.
Select New.
In the list, highlight the selected row.
In the Fiscal calendar period field, enter or select a value.
In the Actual version field, enter or select a value.
Expand the Fiscal periods per column section.
Select Yes in the Current period field.
Expand the Columns to display for Costs section.
Select Yes in the Fixed cost field.
Select Yes in the Variable cost field.
Select Yes in the Total cost field.
Select Save.
Close the page.
Go to Cost accounting > Workspaces > Cost control.
In the Fiscal calendar period field, enter or select a value.
In the Cost object dimension hierarchy node field, enter or select a value.
After you've selected a Cost object dimension hierarchy, expand the Cost element dimension hierarchy in Cost accounting > Setup > Cost control workspace configuration to view the desired cost values. For example, you can expand the hierarchy to Manufacturing overhead to see the value.

Next unit: Cost objects
Cost objects are financial dimensions that you analyze within cost accounting. Dimension mappings help when you're consolidating multiple legal entities. You can map dimension values that are used in the different legal entities to a single value to provide a consistent view of the data. Additionally, you can define dimension hierarchies on the cost objects to use for reporting and to help make individual nodes within the hierarchy more secure.
A cost object is a collector for costs. It's a financial dimension. The list of members in a cost object is imported from the values for the financial dimension. What makes cost objects different from the dimensions is the ability to link or map values from one cost object (dimension) to another cost object (dimension). These mappings can help you link values that should be combined for consolidation. Cost objects are used in policies and dimension hierarchies.
Create a cost object
To create a cost object, follow these steps.
Go to Cost accounting module > Dimensions > Cost object dimensions.
When you set up a cost object, select the data that's provided on the Cost object page. Provide a Name and a Description.

Set up a data provider by selecting the Configure data provider menu item.
Specify the financial dimension to which the cost object is mapped. You can create multiple cost objects for the same financial dimension.
Import the dimension members (dimension values). Select the Import dimension members menu item. Unless you have many dimension values, you can run this operation without creating a batch job.
When you import the dimension members, you can view the members by using the View dimension members menu item. You can't change this list.

You can define a cost object that isn't related to a dimension by selecting the Imported dimension members option from the Data provider dropdown menu.
Select the Configure data provider menu.


You can import the values for imported dimension members by using the Data Management Framework. The framework uses the Imported cost object dimension members data entity. This entity allows you to define statistical elements and group cost objects to reduce the amount of detail that appears within reports.
Set up a cost object
When analyzing costs, you'll use cost element dimensions to determine where costs flow. You can use cost objects, also known as cost object dimensions, to determine where to assign costs.
You can include products, projects, resources, departments, cost centers, and geographical regions as the cost object. Typically, cost objects should be any type of object that you want to estimate, allocate costs to, or measure directly. It helps you to quantify costs and perform profitability analysis.
To create a new cost object, go to Cost accounting > Setup and then open Get started. You'll need to implement the following list as guided in the left panel.
- Welcome - Select the Next button in the lower part of the screen.
- Data connector – General ledger - Select the legal entity and then the Next button.
- Cost element - Select the main account types that you need to consider. Select the account types and then select the Next button.
- Cost accounting ledger - Select the Fiscal calendar, Exchange rate type, and Accounting currency to be used for cost accounting.
- Cost object - Choose the financial dimension that you need to use for your measure.
- Data connector – Budget - Select the budget model for the legal entity that you've created. You can also clear the budget data connector altogether.
You can refer to the created cost object from the Cost object dimension details page under Cost accounting > Dimensions.
Select the View dimension members button in the Action Pane to show the dimension values that are available for the financial dimension that you selected for the cost object.
To make the import of cost object dimension members easier, you can use data connectors to retrieve the values from the entities that you want to use as cost object dimensions. You can use the prebuilt data connectors or custom data connectors that you build.
Cost accounting supports integration of data from source systems through a set of data connectors:
- Imported transactions (preconfigured)
- Dynamics 365 Finance (preconfigured)
- Dynamics AX (configuration required)
Cost categories
The function of a cost category in Cost accounting is equivalent to the function of a chart of accounts in General ledger. Cost amounts are posted to cost categories through general ledger postings or cost accounting postings.
Each cost category must have one of the following three cost types assigned to it:
Primary costs - Represent the flow of costs from financial accounting to cost accounting. Primary costs are always posted directly, and you can set up primary costs to be identical to the profit and loss, revenue, or costs of the general ledger accounts. When the cost categories are the same as general ledger accounts, they're created automatically as primary costs. Not all main accounts can be represented as cost elements, depending on the business needs. Examples of primary cost elements are:
- Costs of goods sold (COGS)
- Indirect material cost
- Personnel costs
- Energy costs
Secondary costs - Represent the flow of costs internally because these costs are created and used only in Cost accounting. You can't post secondary costs directly. You'd use secondary costs to post allocations and overhead calculation. When you set up allocations, cost categories that are secondary costs are mandatory. Examples of secondary cost elements are:
- Production cost
- Production, material, and marketing overhead
Service categories - Use this cost type to post quantities. Service categories are linked with the production cost categories or the project categories.
When a cost category is created manually in Cost accounting, the local account option is enabled automatically, and you can use the cost category in cost accounting only. You can't use cost category numbers later as account numbers for general ledger accounts.
Dimension mappings
Dimension mappings allow you to link multiple dimension values to a single value for reporting. This scenario is common when different legal entities maintain data by using different detail levels and you need to consolidate the data for reporting. The mapped to dimension provides a consistent value that you can use regardless of legal entity.
To create dimension mappings, select the Dimension mappings menu item from the Cost object dimension page and then select Configure mappings from this dimension or Configure mappings to this dimension.
If the cost units in one company must roll up to cost units in another, select Configure mappings to this dimension after you've selected the cost unit dimension. Select the New button and then select Cost center groups as the To dimension. Then, add all mappings that you need to work with.
In this example, assume that one legal entity records customer service against individual channels while another records at a single cost center of Service Operations. You can link all individual channels to the same cost center group for analysis.

This type of mapping is commonly done with main accounts for consolidation. It allows for cross-company reporting with a standardized set of main accounts (represented as cost elements). Cost accounting also allows you to map financial dimensions (represented as cost objects). You can create as many mappings as you need by creating more cost objects and cost elements from the same data and then defining different mappings for each. You can use this mapping for the cost element to support the incorporation of a cross-company accounting scenario.
Dimension hierarchies
A hierarchy is a tree with specific values/value ranges of the dimension that's specified for each leaf node. The following screenshot is a simple P&L statement hierarchy based on main accounts (cost elements). You can build the same type of hierarchical structure for any cost object (financial dimension).

You can use dimension hierarchies for cost elements, statistic elements, and cost objects. These hierarchies are considered dimensions for analysis purposes.
Two types of dimension hierarchies are:
- Classification hierarchies - Use this type for rules and reporting. You need to specify each dimension value within the hierarchy.
- Categorization hierarchies - Allow for a dimension value to be specified multiple times in the hierarchy or not at all. These hierarchies are used for reporting only.
To create a hierarchy, go to the Cost accounting module, select the Dimensions group, and then select Dimension hierarchies. Select the New button to create a hierarchy and then select the type for the hierarchy.
Secure a hierarchy
If you want to limit access to specific nodes in the hierarchy to specific users, you can add the users to the User FastTab for the hierarchy. This tab is only visible if you set the value of the Access list hierarchy option to Yes.
You can only add individual users (not user groups) on this tab. Only users whom you've specified will have access to the specified node and child nodes.
Next unit: Work with the Cost accounting Get started wizard
Cost accounting in Finance provides important insights into the cost efficiency and capacity of the managerial decision-making processes. It empowers cost controllers and cost center managers to control, classify, allocate, and analyze costs of current operations and plan for future changes.
With the flexible data integration framework that's built into cost accounting, you can collect data across a wide range of data sources. Workspaces, along with a seamless integration with Microsoft Excel and the Cost accounting analysis content pack for Microsoft Power BI, provide powerful management reporting and critical business data at all organizational levels.
You can import data, such as general ledger entries and budget entries, into Cost accounting through data connectors. You can use preconfigured connectors or custom connectors to import data.
By using the Cost accounting Get started wizard in Cost accounting > Setup > Get started, you can select the legal entity from which you want to import data into cost accounting. Only one legal entity can be handled at a time. You can run this wizard again for a different legal entity.
If you open the Cost Accounting Ledger Administration workspace before setting up Cost accounting, the following page will display, where you can access the wizard.
The first screen describes cost accounting processes within Finance.

Select the Next button to begin the setup. Select a legal entity from the dropdown list and then select Next.
You can create cost accounting for a specific legal entity from any other company in your organization, assuming that you've been granted adequate security roles.
A cost element corresponds to a cost-relevant item in the chart of accounts. Basically, it can be any type of element at the lowest level in a business for estimating, controlling, and reporting costs. Cost elements range from ledger accounts to all cost-relevant resources. Cost accounting in Finance supports ledger accounts.
Based on the selected legal entity, the chart of accounts is selected for you. By default, main accounts of type Profit and loss, Expense, and Revenue will be converted to cost elements. You can update these selections, if needed. If you want to add more account types, select New.

A cost accounting ledger is defined by its attributes:
- Fiscal calendar
- Accounting currency
- Cost element dimension
- Statistical element dimension
- Policies
The cost accounting ledger is a summary of all transactions that are measured in terms of a monetary amount or magnitude, depending on the element type, such as cost element or statistical element.
All entries (cost entries or statistical entries) are accounted for by means of journals, which list all transactions by date. Managerial statements are generated based on summary totals in the cost accounting ledger.
You can select the fiscal calendar, exchange rate type, and accounting currency to be different from those values that have been defaulted from the selected legal entity. Data from individual legal entities will use the specified currency and exchange rate type to convert from the legal entity currency to the selection.

Select the financial dimensions that you want to analyze in the cost accounting ledger. You should select only account structure elements that are used by the ledgers of the legal entities that you're importing.
A cost object can be any type of object that you want to estimate, allocate cost to, or measure directly. Typical cost objects include products, projects, resources, departments, cost centers, and geographical regions. You can select the financial dimension for the members on which you want to perform cost control.
You can only select one dimension by using the wizard. You'll need to create others outside the wizard.
If you haven't set up budget data correctly, or budget data isn't important to you, you can set the value of the Create budget data connector option to No. You can add data connectors to import budget data anytime.
If you choose to include the budget, leave the Create budget data connector option set to Yes and then select New to select your budget models. You can include Expense or Revenue data and then select a budget type. You can also specify the original and revised budgets for analysis. The system will only import posted budget data. For each budget model, you need to select Budget type and Budget entry type.
You can add one budget model multiple times, provided that the values of Budget type and Budget entry type are different.

Select Finish to allow the system to process your request and create objects. The system will notify you when the batch job is complete, and it will display a Congratulations message.
By completing the Cost accounting Get started wizard, you can create managerial reports through the built-in Cost control workspace, export data to Excel or Power BI, and define policies for Cost behavior classification, Cost distribution, and Cost allocation.
Next unit: Set up cost accounting
You'll need to complete other setup steps after you've run the wizard, including:
- Cost elements
- Cost objects
- Dimension hierarchies
- Statistical elements
- Import data
- Define policies
- Configure the cost control workspace
Cost elements
The wizard creates a single cost element. This cost element represents all main accounts and uses the specified main account types. You can create more cost elements by using subsets of the main accounts. The system uses cost elements to shape the view of the data and apply policies.
Cost objects and dimension hierarchies
You'll want to use more than one cost object. Add more cost objects by using the process that's defined later in this module. Dimension hierarchies allow you to create as many hierarchies as you might need to help secure and aggregate the cost objects.
Statistical elements
Usually, statistical elements are quantities, such as the number of employees. You can import statistical data into cost management and perform allocations within cost management for internal reporting rather than, or in addition to, allocations that are run in the general ledger.
Import data
General ledger and budget data are imported. You should import the data when you want to perform analyses. You'll need to import data again if the data changes.
Policies
Policies describe how the data in the cost accounting ledger is changed during distributions and allocations. You can create the following types of policies:
- Cost behavior
- Cost distribution
- Cost rollup
- Cost allocation
- Overhead rate
To create policies, go to the Cost accounting module and then select the Policies group.
Cost accounting ledger administration workspace
The Cost accounting ledger administration workspace allows you to review data import history and import more data. The workspace is available from the Workspaces section of the navigation pane and at the top of the Cost accounting module. Ongoing management of the cost environment data occurs within this workspace.
Validate the configuration
The Cost accounting ledger administration workspace provides validation messages to help you set up cost accounting. Review the messages and make corrections as appropriate.
[ ] (../media/validation-messages.svg#lightbox)
For a classification hierarchy, you need to specify every value. The message that's shown in the preceding image indicates that a dimension value is missing in the hierarchy.
To enable the validation refresh:
Go to System administration > Setup > Data cache > Data set cache configuration.
Select CAMCostAccountingLedgerSetupValidationCacheDataSet in the Consumer column.
Select the Manual refresh enabled checkbox.


This action enables the Refresh data link on the Setup validation refresh tile.

Next unit: Set up work in progress costing
Work in progress (WIP) is a term that's widely used during implementation of a manufacturing process.
WIP inventory is considered to be more valuable than the raw material, which is yet to be consumed for manufacturing. However, WIP inventory must be less valuable than the finished goods inventory, which is ready to sell. Hence, for a long-term manufacturing process or a long duration project, it's important to maintain the WIP cost to achieve the proper valuation. Raw material cost, direct labor cost, and factory overhead are different cost elements that are associated with the WIP inventory and that you should consider.
Set up work in progress costing for a production process
To define the WIP account for a manufacturing process, go to Cost management > Inventory accounting policy setup and then open Item groups. In the Production FastTab of the Item groups page, you can define the WIP accounts.

The value of WIP raw material is posted to the ledger account that's been set up for Estimated cost of materials consumed, WIP. When a picking list is posted for the production order, the inventory transactions are posted to physically update the inventory. At the end of the production process, the Cost of materials consumed, WIP is updated along with the Cost of materials consumed. The ledger account that's been set up for Estimated manufactured cost, WIP is also posted with the WIP raw material value. At the end of the production process, posting happens in the ledger account for the Manufactured cost, WIP along with the Manufactured cost ledger account.
Alternatively, you can set up these ledger accounts in Inventory management > Setup > Posting > Posting. You can go to the Production tab to define the required ledger accounts for all WIP processes.
In the Item code column, select All to define the ledger account for all items.
You can select the Group in the Item code column to set up a ledger account for a group of items that belong to a specific item group.
Additionally, you can select Table in the Item code column to define a ledger account for a specific item for a specific posting type.

Set up work in progress costing for a project
For an ongoing project, the WIP amount is the total accumulated cost or revenue. You can calculate it based on the item, time, and expenses that are posted to the WIP financial accounts. During customer invoicing or closure of an internal project, the accumulated project costs are reversed from the WIP account.
Actual costs for hours, expenses, and items are posted to a ledger account that you've defined for WIP – cost value. When costs on a project are invoiced to the project customer or when an internal project has completed, the costs and associated revenue are posted to profit and loss accounts. The WIP - cost value option is available for all project types.
When actual costs are posted to a project, the costs are accrued as revenue. You can complete these accruals by crediting a revenue account on the profit and loss statement and by debiting a WIP - sales value account. The WIP - sales value option is available for the time and material and the fixed price projects.
In the Project management module, you can define WIP accounts on the Ledger posting setup page under Setup > Posting.
On the Ledger posting page, you can define ledger accounts for cost and revenue in two different tab pages.
Cost accounts have defined ledger account types that you need to select for which you want to set up the ledger accounts.
Revenue accounts also have defined ledger account types that you need to select for which you want to set up the ledger accounts.
You can define the ledger accounts based on two criteria: Project and Transaction category. You can select All, Group, or Table for both criteria while you're setting up the project or transaction category. The Table option will help you define the specific ledger account for the project or transaction category. You can define a specific group of project or transaction category by defining Group.
If you want to set up the ledger accounts based on Project group only, go to Project management > Setup > Posting and open Project groups, where you can define the ledger accounts for each ledger account type that's applicable for the project group only.
Next unit: Exercise - Configure Cost accounting by using the Get started wizard
The Chief Financial Officer (CFO) of company GBSI, needs to configure the Cost control workspace to analyze the costs by department for different periods to compare actual expenses versus budget. Use the following procedure to use the Get started wizard to create what the CFO needs.
Before you begin
To get the most benefit from this exercise, we recommend that you have the standard sample data available in Dynamics 365 Finance that is installed by using Lifecycle Services.
- In company GBSI, go to Cost accounting > Setup > Get started.
- Select the Cost accounting home page.
- Select Next.
- In the Legal entity field, select the GBSI legal entity.
- Select Next.
- Select Next.
- Select Next.
- Select Dimension name.
- Select Next.
- Select ellipses (...) under Legal Entity
- Select New.
- In the Budget model field, enter or select a value.
- In the Budget type field, select an option.
- Select Next.
- Select Finish.
- Go to Cost accounting > Workspaces > Cost control.
- In the Cost object dimension hierarchy node field, enter or select a value.
- Click View Details from the ellipses to see the data.


Comments
Post a Comment