Outbound operations on D365 Process
Outbound operations
Output orders are used to link sales order lines and transfer order lines with the outbound picking processes that use picking lists.
When picking lists are generated from either sales orders or transfer orders, output orders and shipments are automatically created. A picking list has a one-to-one relationship with a shipment. The transfer order shipment or the sales order packing slip can be processed from the shipment.
The following figure shows an overview of the process for outbound orders.

You can set up outbound rules to define how Supply Chain Management should handle the outbound process. You can use these rules to control the shipment process and to control during which stage in the process a shipment can be sent.
The following settings define how the outbound processes are handled.
Picking route status for sales and transfer orders
Go to Account receivable > Setup > Account receivable parameters and then, on the Updates tab, select a value in the Picking route status field.
If the Picking route status field is set to Completed, the picking process occurs automatically as part of the process of generating picking lists. If the field is set to Activated, the picking list lines must be manually updated.

The same setup applies to transfer orders. Go to Inventory management > Setup > Inventory and warehouse management parameters and then, on the Transfer orders tab, select a value in the Picking route status field.

End output inventory order
Go to Inventory management > Setup > Inventory and warehouse management parameters and then, on the General tab, set the End output inventory order option to Yes.

When the warehouse worker reduces the picking list quantities, then the corresponding inventory order quantities will be removed from the shipment.
When the picking list is updated at a point in time, the remaining quantities are reported back to the order if the End output inventory order option is set to Yes.
If the End output inventory order option is set to No, the remaining quantities are kept as an open output order quantity and must be added to a new picking list as part of the Open output orders functionality.

Reduce quantity
The third parameter that you can use as part of the process of generating picking lists is the Reduce quantity parameter. The setting of this parameter works together with the Reservation setting that triggers a reservation process as part of the release to the warehouse.

Example of an outbound process for a sales order
For this example, there is a sales order for two items. During picking list generation, you select the Reduce quantity parameter.
Therefore, you release and create picking lines only for available on-hand inventory. The picking must be reported by means of a registration process for picking lists (Picking route status = Activated).

The inventory that hasn't already been reserved is reserved during picking list generation. The unavailable inventory can be either removed from the sales order or released to the warehouse for outbound processing later, when inventory is available for picking.

Next unit: Configure inventory dimensions
It's important to consider how you want your inventory to function prior to setting up the inventory dimensions and dimensions. The type and number of inventory dimensions that are created must be a realistic reflection of how you categorize, or treat, each of the inventory items in your company.
Inventory dimensions are divided into the following categories:
- Product dimensions - Help define the physical characteristics of inventory items. The available product dimensions in Supply Chain Management are: Configuration, Size, Style, and Color.
- Storage dimensions - Control how items are stored and taken from inventory. By using storage inventory dimensions, you can manage inventory on a detailed level.
- Tracking dimensions - Serial and batch numbers provide companies with the ability to trace their products through Supply Chain Management, which is essential for quality assurance purposes and when you deal with warranties for a product.
Packing and storage dimensions
Products can be packed and stored in different ways. Therefore, you need to set up different physical dimensions to support your processes. The Packaging product dimensions feature allows you to set up several dimensions for products.
First, you must enable the Packing product dimensions in the Feature management workspace.
With the feature enabled, these dimensions are available:
- Storage - Storage dimensions are used along with location volumetrics to determine how many items can be stored in various warehouse locations. This is the available default dimension without turning on the packaging product dimension feature. When Packing and/or Nested packing are not specified on a product, the storage dimensions will be set up at Released products > Manage inventory tab > Physical dimensions.
- Packing - Packing dimensions are used during containerization and the manual packing process to determine how many items fit in various container types.
- Nested packing - Nested packing dimensions are used when the packing process contains multiple levels.
To set up the Packing and Nested packing dimensions, follow these steps:
- Go to Released products > Manage inventory tab > Physical product dimensions.
- Select the Physical dimension type.
- Enter the product dimensions:
- Physical unit
- Weight
- Weight unit
- Depth
- Height
- Width
- Length unit
- Volume unit - the volume will be calculated.

When you try to put a product in an area that does not fit, you will receive an error that the product will not fit in the area based on your dimensions.
The Version product dimension
Version is a product dimension that helps you maintain and track multiple versions of a product throughout the supply chain. Version tracking will behave similarly to other product dimensions (size, style, color, and configuration). Therefore, you can use it for other purposes besides tracking product versions.
The version product dimension must be turned on under System administration > Setup > License configuration > Configuration keys > Trade > Product dimension - Version.
When Product dimension - Version is enabled, you will find it in Product information management > Setup > Dimension and variant groups > Versions.
Next unit: Configure storage dimensions
Storage inventory dimensions represent the different ways in which items are stored and retrieved from inventory. This allows for inventory to be managed at a detailed level. The type of details that you apply to the creation of storage dimensions depends on your company’s needs and expectations. Consider the relevance of each dimension, especially when items have special handling needs.
The storage dimensions that are available in Supply Chain Management are:
- Site
- Warehouse
- Location
- Inventory status
- License plate
A storage dimension group must be assigned to a released product. Storage dimension groups are used to determine how inventory will be stored in your warehouse. Supply Chain Management includes some inventory dimensions and options for you to consider when creating your dimension groups.
Product information management > Setup > Dimension and variant groups > Storage dimension groups

Some examples might include the following requirements:
- Dairy foods must be kept cool.
- Pharmaceutical goods must be easily identifiable.
- Ice cream must be kept frozen.
Scenario
A bicycle company has several facilities that store and manufacture bicycle parts. At each facility, 10-speed sprockets are stored in one bin, and 12-speed sprockets are stored in another bin. However, because bicycle frame sizes are easily determined, they are not separated in the warehouse. Adult and children's frames are stored in the same racks. The company wants to ensure that an accurate count of inventory is kept for all parts.
Mandatory
Select the Mandatory slider on the Storage dimension groups page to make the dimension mandatory. A mandatory dimension appears on all journals and transactions, and you must specify a dimension value when creating an entry.
The following rules apply:
- Product dimensions are always mandatory.
- When the multi-site functionality is active, the site storage dimension is mandatory.
- It is optional whether the warehouse storage dimension is mandatory.
- You cannot specify the remaining inventory dimensions as mandatory.
Primary stocking
To set up inventory dimensions as primary stocking, on the Storage dimension groups page, select the Primary stocking slider. (If you want it to be secondary stocking, do not move the slider.)
A primary stocking dimension will appear automatically on the On-hand and Reservation pages. This affects how ordered items are re-reserved upon physical item receipts. The following rules apply:
- The dimension must be specified when you are physically updating item receipts or issues.
- When automatic reservation is active, items are reserved according to the selected dimension, provided that the dimension is also specified for the actual item transaction. This means that if the warehouse is specified on a sales order line, and primary stocking is specified, automatic reservation only reserves items at this warehouse.
- Ordered reservations are not re-reserved upon physical receipt. If a sales order line is reserved at warehouse A and location 1, and warehouse is set to primary stocking and location is set to secondary stocking, the sales order line does not automatically re-reserve if the warehouse is changed when the receipt is physically updated. If the location changes to 2, the order line automatically re-reserves for location 2.
Blank receipt allowed and Blank issue allowed
Select the Blank receipt allowed or Blank issue allowed check boxes on the Storage dimension groups page to apply the following results:
- Blank receipt allowed - If you do not select the dimension as primary stocking, selecting this check box leaves out the specification of the dimension when physical receipts are updated. This functionality is useful, for example, when you are not specifying the serial/lot number upon input but doing so for picking and output.
- Blank issue allowed - If the dimension is not marked as a product dimension, or as primary stocking, selecting this field leaves out the specification of the dimension when you are updating physical issues.
Physical inventory
Select the Physical inventory check box to specify that the dimension is entered into the on-hand inventory when the system checks whether the item is available in inventory.
Financial inventory
Select the Financial inventory check box to indicate that this dimension is part of the financial inventory.
The parameter is of significance if you are not operating with financially negative inventory with the financial update of item issues, for example, invoice-updating in the Accounts receivable module. The system checks the financial on-hand inventory upon item issues according to the same logic that was described in the topic concerning Physical inventory.
The Financial inventory parameter also determines how item consumption is calculated upon invoice updating, inventory closing, and cost accounting of the cost value.
Coverage plan by dimension
Select the Coverage plan by dimension check box on the Storage dimension groups page to complete the coverage plan for the item individually, instead of as a group.
For purchase price
When you select the For purchase price check box on the Storage dimension groups page, the search for purchase prices is based on the following rules:
- Search price for each item, product dimensions, and storage dimensions
- Search price for each item and product dimensions (storage dimensions are blank)
- Search price for each item (both product dimensions and storage dimensions are blank)
For sales prices
When you select the For sales prices check box on the Storage dimension groups page, the search for sales prices is based on the following rules:
- Search price for each item, product dimensions, and storage dimensions
- Search price for each item and product dimensions (storage dimensions are blank)
- Search price for each item (both product dimensions and storage dimensions are blank)
Next unit: Configure tracking dimensions
Serial and batch numbers provide companies with the ability to trace their products through Supply Chain Management. The numbers are used for the following purposes:
- Tracing
- Quality assurance
- Warranties
Traceability is useful for quality assurance purposes and when you deal with warranties for a product. The tracing functionality is especially important for items that represent a certain risk, such as medicine or chemicals, where defects in production can lead to item recall. It is equally important for guaranteed items to be able to trace back to the date that the product was manufactured or sold.
Serial and batch numbers allow for this kind of functionality. You can assign serial numbers, batch numbers, or both to an inventory item. Serial numbers are assigned to individual items, where batch numbers are assigned to a set of items.
You can use tracking dimensions to identify and determine how items should be tracked. By using tracking dimensions, you will be able to manage inventory on a detailed level.
A tracking dimension is a required field on every product that you set up in your system. As the name implies, it is used if you need to track an item throughout its life. For example, you might assign batch numbers if there is a need to track an item back to the manufacturing of that item.
Batch numbers apply to a group of items, while a serial number applies to a single item. You can also specify if the batch or serial number is a required field when you process various transactions in the system. In some cases, you might create a tracking dimension if your product requires both a serial number and batch number. You can also have products that have neither dimension assigned to the product.
Product information management > Setup > Dimension and variant groups > Tracking dimension groups
![]()
Tracking dimensions are necessary when you need to act based on a recall scenario. For example, if a company has purchased products and the vendor has issued a recall due to some issues with those products. Upon registration of the products prior to placing them in the proper location of a warehouse, you can find the products, pick them, and send them back through a vendor return order.
If a company accepts consignment items from vendors, which means the products belong to a vendor, unless the company changes the ownership of the product, you can enable the Owner dimension and use the Change ownership inventory journal. After the ownership changes, it becomes the company’s liability to process the vendor invoice and provide payment.
Lot ID is the term that refers to a transaction, and not an item dimension such as serial and batch numbers. A Lot ID is assigned automatically to each sales or purchase line when you create it. The number is taken from the number sequence that is associated with the number sequence reference Lot No. in the inventory parameters. You cannot make transactions without a Lot ID being assigned, unlike using batch numbers, when you can select to either use them or not.
Serial and batch numbers are inventory tracking dimensions and can be allocated to products only when the products' tracking dimension group allows for it.
If you select the Serial number control parameter on the Tracking dimensions group page, the system will only allow for inventory movements with a quantity of one.
To use this functionality, select the Serial number control slider for the relevant inventory dimension groups.
When you are physically receiving or updating items that arrived in the warehouse, the physical on-hand quantity plus the arrival quantity cannot exceed one. Physical inventory is automatically selected to handle the control correctly, and usually the Physical negative inventory field on the Inventory model groups page is clear. Therefore, the functionality is unchanged.
The tracking inventory dimensions that are used to track items on the warehouse and outside are:
- Batch number
- Serial number
- Owner
Trace inventory dimensions function
The trace inventory dimensions function not only traces serial and batch numbers, but also provides details of all other dimension values that are associated with the item.
If the parameters for tracing are specified on the Trace inventory dimensions page, you can change the Item number, Record ID, Lot ID, and Dimension number fields by selecting the Select button.
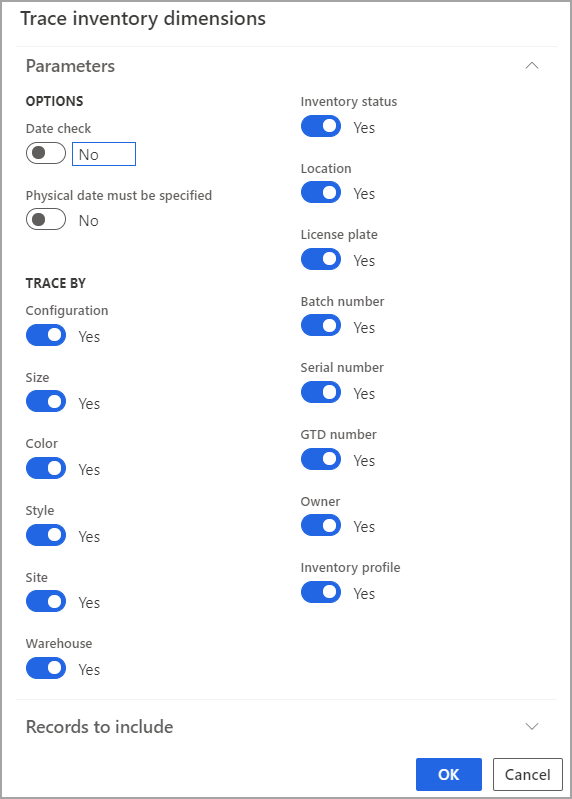
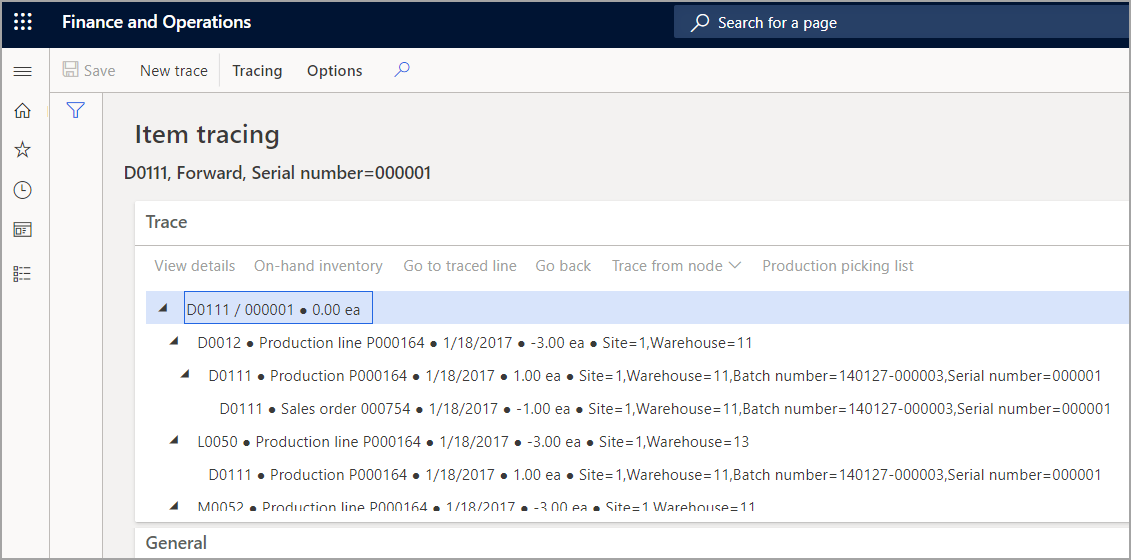
When the Trace inventory dimensions report is run, the result displays in a tree graphic. The Format field shows the format for the transactions.

You can use the Item tracing page to find details such as transactions, associated quality orders, production orders, batch numbers, and more.
Next unit: Configure serial and batch numbers
Batch numbers are assigned to groups of physical items and serial numbers are assigned to individual physical items. These numbers are then specified on the inventory transaction to identify the product that is being received or delivered.
Batch and serial numbers can be used individually or together.
Scenario
Batch and serials numbers are typically used when you handle food and other types of products that are consumed by humans, such as pharmaceuticals. They can also be used frequently in the handling of hazardous or sensitive materials, such as chemicals or items that must be refrigerated.
Assume that you have a large tank that is used to produce dairy products. The tank is cleaned and emptied before each production order is started. You have produced 10,000 gallons of ice cream and then packaged the ice cream into one-gallon containers.
You can use the batch number to identify the batch or tank of ice cream that is produced, and then use a serial number to uniquely identify each one-gallon container that is produced. By doing this, you can trace the exact container and the tank of ice cream that is produced, even if the individual containers are spilt up around the warehouse or shipped to different customers.
Serial numbers
Serial numbers can be manually or automatically assigned to products on receipt. Use manual allocation of serial and batch numbers if you want to trace the items back to the vendor.
For example, when you receive chemical or medical items, make sure that you continue to use the serial and batch numbers that are provided by your vendor so that you can fully trace and recall defected items throughout the supply chain.
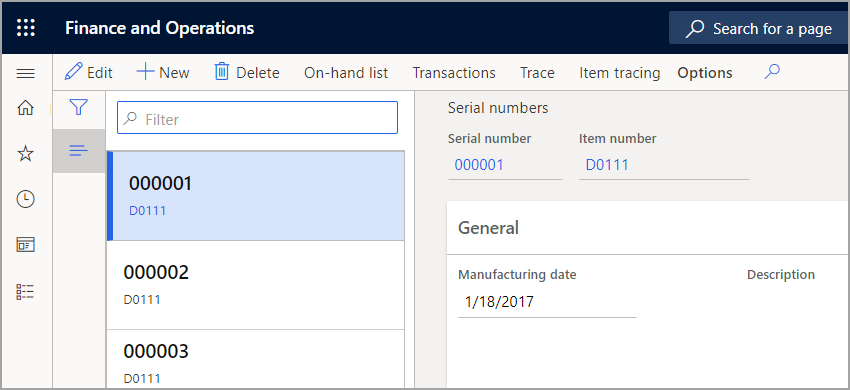
Manual allocation of serial numbers requires you to set up the Inventory dimension group and a serial number for the specific item on the Serial number page. You can also set up serial numbers in advance.
Open the Serial numbers page from Inventory management > Inquiries and reports > Tracking dimensions > Serial numbers.
Assign serial numbers
You can manually assign a serial number to a product when you perform the following tasks:
- Working on a product directly on a sales or purchase order line
- Registering the products at the time of item arrival
You can type any number directly on the line in the Serial number field. However, to have better control of the serial numbers that are used for each item, create the serial numbers for a product number on the Serial numbers page.
If serial numbers are assigned manually to item transactions, and the Tracking dimension group of the item has Serial number control selected, any manually assigned serial number will be added to the Serial numbers page.
The serial number that is specified in the Serial number field on the purchase order line is assigned to all products on the line. If Serial number control is selected for the Tracking dimension group, serial numbers must be unique for each item, and you cannot assign a serial number to the order line if the quantity is greater than one.
When you enter the serial number, use the pound (#) sign to indicate how many digits you want to appear in the serial number. The minimum number of pound signs in a serial number is as many as the number of digits in the item quantity.
The Create serial numbers button always creates unique serial numbers. If you want to have the same serial numbers assigned to a quantity other than one, type serial numbers manually in the Transactions/Register now pane and use split functionality. Alternatively, you can use a number group to auto-create serial numbers with a fixed quantity other than one unit.
If serial numbers are assigned automatically, then the serial numbers that are entered on purchase or production order lines will not be added to the Serial numbers page.
Batch numbers
A batch number must be created before it can be assigned to a product. Unlike serial number assignment, a batch number cannot be entered directly in the Batch number field on the order line. It must be created on the Batch number page and then selected from the line in either the sales or purchase order.
To create or view batch numbers, go to Inventory management > Inquiries and reports > Tracking dimensions > Batches to create tracking numbers for batch numbers that will be assigned to a product.

Tracking number groups
If you want to use automatic allocation of serial or batch numbers, go to Inventory management > Setup > Dimensions > Tracking number groups to create tracking numbers for serial and batch numbers that will be assigned to a product.
To automatically allocate serial or batch numbers, you can create a number group and assign it to the item. Serial and batch numbers can be assigned to several products, sequentially from the same number group.

In the General field group, specify when and how the automatic number must be assigned by considering the following fields:
- Manual - Select to assign manual serial and batch numbers to the products that are associated to this number group.
- Only for inventory transactions - Select to assign the generated numbers to the transaction instead of, for example, the purchase order line. The serial and batch numbers are generated and assigned when a purchase order is created. The numbers cannot be viewed from the purchase order line. However, one transaction is listed on the Transactions page with one serial or batch number.
- On physical update - Select to assign the generated number when a product transaction is made. This means that the serial and batch numbers are not generated until a packing slip and a picking list registration is posted. The serial numbers cannot be viewed on the purchase order line. However, one transaction is listed on the Transactions page with one serial number.
- Per qty. - Specify the quantity of products to be assigned to the generated number. To assign unique serial numbers and batch numbers, type 1 in the Per qty. field. The Only for inventory transactions slider must be selected for this field to be active.
For example, if the Only for inventory transactions slider is selected, 25 is specified in the Per qty. field and a purchase order is made for 60 products, and then three batch or serial numbers are generated when the purchase order is created. Then, 25 products are assigned the first batch or serial number, another 25 products are assigned the second batch or serial number, and 10 products are assigned the third serial number.
Notice that if the Serial number control slider is selected in the Serial numbers FastTab for a product, an error will appear if you try to post the packing slip with a product if, for example, 2 is specified in the Per qty. field for the Serial number group.
If you do not select any of these fields, one batch or serial number is assigned to the purchase order line when a new order is created and saved.
Consider the following fields for automatic activations:
- Order activation - Select to enable automatic number allocation in the Accounts receivable and Sales and marketing modules. This also generates new numbers when products are returned by credit notes.
- Purchase activation - Select to enable automatic number allocation in the Accounts payable and Procurement and sourcing modules.
- Inventory activation - Select to enable automatic number allocation in the Inventory and warehouse management module. For example, you discover five products in your warehouse that are not in the inventory. To add the products to inventory, make a Profit/Loss journal for the five products. When the Profit/Loss journal is posted, the products are allocated serial numbers according to the settings of the tracking number group.
- Production activation - Select to enable automatic number assignment in the Production control module.
- Kanban activation - Select to enable automatic number assignment in Lean manufacturing.
The normal setup is to have all fields except Order activation selected because you do not want to enable the change of serial numbers when a return action is performed.
Serial and batch numbers can be updated if it is necessary. When you enter an inventory dimension on a receipt transaction, you can change the value by using a Transfer journal. A change of inventory dimensions causes a movement of on-hand inventory from one dimension to another.
Next unit: Allocate batch and serial numbers
Serial and batch numbers are inventory dimensions. Therefore, assign them only to items that have tracking dimension groups where these dimensions are active. You can assign serial or batch numbers manually or automatically, depending on whether the item has a serial number that can be scanned into Supply Chain Management, or whether the serial number should be assigned based on a serial number group.
Scenario
A company manufactures bicycles by welding aluminum tubes into bicycle frames. They receive aluminum tubes from a supplier who casts the tubes in batches. Each delivery of tubes to the bicycle manufacturer is marked with the supplier’s batch number. The bicycle manufacturer creates a bicycle frame and wants to track each frame as it moves through the manufacturing and assembly process. To track the parts, the company does the following:
- Creates a number group for aluminum batches that allows for the manual allocation of a number.
- Manually enters supplier batch numbers in inventory transactions for aluminum tubes.
- Creates a number group for bicycle frames that disallows manual allocation.
- Enables Supply Chain Management to automatically assign a serial number for each bicycle frame inventory transaction.
Next unit: Configure sites
Sites are inventory storage dimensions and can be linked to the financial dimensions framework for general ledger integration. At least one site must be created for each legal entity in Supply Chain Management, and all transactions must refer to a site. A single site cannot be shared by multiple legal entities. A company can establish logistic operations at multiple sites for many reasons.
Although sites are the only required setup, we recommend that you set up the other inventory dimensions based on business requirements.
Each physical inventory dimension setup provides another level of detail for storing and issuing inventory in your system. This helps provide better detailed reporting and on-hand quantities that are more specific to the physical location of the items.
These physical inventory dimension setups might include setting up distribution centers that serve different geographic markets or setting up production facilities at a location because of reduced overhead costs, closeness to raw materials, or convenient transportation.
For example, you can configure multiple sites to reflect your unique business model and support operations and process flows. Examples of business environments where you could set up multiple sites include the following:
- A single production site that uses a single warehouse
- A single production site that uses multiple warehouses
- Multiple production sites that use a shared distribution center
- Multiple local production sites that use a shared production site
To create a new site, go to Inventory management > Setup > Inventory breakdown > Sites.

When you have created a site, you can only delete it if:
- The site is not referenced from warehouses, production resources, or other master data.
- There is no open on-hand inventory that is associated with the site.
If either of these conditions is not true, Supply Chain Management displays an error message, and you cannot delete the site.
A warehouse is a place that can store items. All items accounted for by the system must be placed in a warehouse. Because many parameters and policies are set up for each warehouse, you can control and differentiate the warehouse operations by defining several warehouses.
Warehouses are usually a geographic location, or they serve a certain function, such as a spare parts warehouse or a finished goods warehouse. When you have several warehouses, the total on-hand inventory can be split up. All item transactions can be attached to a warehouse that then follows the transactions throughout the system.
When you are indicating a warehouse for a transaction, specify the site where you can place or pick an item geographically. This means that you use separate warehouses for distinct geographic locations.
In some cases, you can have virtual warehouses. This means that the warehouse might not be a separate physical building, but might be a logical separation or part of a building. This strategy can be used to meet complex business requirements.
To create a new warehouse, go to Inventory management > Setup > Inventory breakdown > Warehouses.

A warehouse should not be used as a financial inventory dimension. Instead, you should create separate sites.
Warehouse types
When you create a warehouse, specify a warehouse type, as follows:
- Default - A main warehouse.
- Quarantine - Attach warehouses of the Quarantine type to regular warehouses of the Default type. When you purchase items that are quarantine-controlled to a warehouse, they are automatically put in the warehouse of the Quarantine type that is attached to the receiving warehouse. When you end the quarantine, the items are then transferred to the specified receipt warehouse.
- Transit - Use for transfer orders and the delivery date control function. Transit warehouses are the system-technical intermediary warehouses between the From and To warehouses, or warehouse and delivery location with the delivery date control functionality.
A warehouse could be organized into locations to keep stocked items in their proper locations. Usually in a simple warehouse, a warehouse location has a format of aisle-rack-shelf-bin.
The following figure illustrates a sample of a grocery store warehouse layout.

You can specify transport times for the selected warehouse by selecting the Transport button. Transport times are used in the delivery date calculation when you use the delivery date control with transfer orders.
If you do not specify a warehouse on the product, you can specify the warehouse from which the products are to be sold or purchased on the sales and purchase order header and on the individual lines.
The warehouse that is specified in the header applies to all lines, unless otherwise individually specified, either on the product or manually on an order line.
Inventory aisles
A warehouse is divided into inventory aisles. Inventory aisles are used to group locations. An aisle has an aisle ID and an aisle number, which can be the same. The aisle ID, typically the first part of the location name, is an alphanumeric identifier for an aisle. The letters help identify a warehouse or area within the warehouse.
The aisle number is a strictly numeric identification of the aisle in the warehouse. The aisle number is used by the system when it is generating sorting codes. You can assign unique IDs to the inventory aisle by using the Warehouse and Aisle fields.
By default, inventory aisles are sorted in ascending order. By selecting the Descending field, you can reverse the picking route for the relevant aisle. This changes the order from the highest value to the lowest value.
Location
The term location refers to the place that items are stored and drawn from. Location is the most specific indication of where the items are stored in the warehouse. For each location, the place where the item is inserted can also be specified. By default, they are the same. Items are usually inserted and drawn from the same side of a location, but not always.
For example, items that are stored in live storage racks are inserted from one aisle and drawn from another. The main input is given by a location name, which is usually determined by its coordinates: warehouse, aisle, rack, shelf, and bin. This name or ID can be entered manually or generated from the location coordinates—for example, 1-2-3-4 for aisle 1, rack 2, shelf 3, bin 4—on the Inventory locations page.
A location has the following characteristics:
- Size (height, width, depth, and thereby volume)
- Warehouse, aisle, rack, shelf, and bin position
- Location type (bulk location, picking location, inbound dock, outbound dock, production input location, inspection location, or kanban supermarket)
- Check text can be used in online systems to verify that the operator has selected the correct location for a specific item. This check text can be created manually or by default.
Use of location is optional. If locations are used, items will be stored at locations, and the system can determine pick routes, counting operations, and so on, based on locations.
Items are usually inserted and drawn from the same side of a location, but not always. For example, items can be stored in a special type of rack, also known as a “flow rack.” This is where the items are inserted from one aisle and drawn from another.
Together with the warehouse, these four coordinates identify exactly where an item should be, or is, in the warehouse: Warehouse - Aisle - Rack - Shelf - Bin.
The following are examples of location types:
- Bulk location - The area in the warehouse where received items are stored until the warehouse worker transports the items to the picking locations. Bulk locations are used to replenish picking locations as their stock is reduced and they are also used for picking.
- Picking location - Where items are stored until they are picked for shipment. They are kept here to ensure easy access for picking. The picking location is used for picking small quantities of an item. An item can only have one picking location in each warehouse.
- Inbound dock - Location in the warehouse where items are received and possibly checked (this is the default if it is not specified elsewhere).
- Outbound dock - Location in the warehouse where shipment occurs (this is the default if it is not specified elsewhere).
- Production output location - Location where the finished items from the shop floor arrive.
- Inspection location - Location where the inspections occur.
- Kanban supermarket - Location where the inventory is controlled and processed for work-in-progress (WIP) products in a Lean manufacturing environment.
Location placement
You can categorize location placement in two ways:
- Input areas - Locations in the warehouse designated for item placement in the warehouse upon receipt. Items are grouped based on similar characteristics or the order in which they are placed in their locations. You can specify the input area for a location on the General tab of the Inventory locations page. For example, items that require cold storage would be in one input area, whereas items that can be stored in the general warehouse storage area would be in another.
- Picking areas - Assigned throughout a warehouse to group items that should be picked at one time or by the same person. You can specify the picking area for a location on the General tab of the Inventory locations page. For example, items that require a forklift for picking and transport would be in one picking area, whereas items that a warehouse worker can pick individually from a floor level with a hand truck would be in another.
Watch this video to see how to create locations for a warehouse:
Warehouse items
After the warehouse is set up with aisles, locations, and store zones, you can assign products to the warehouse. Each product can have multiple warehouse items defined. By default, the system creates a blank warehouse item when the product is saved. The product dimensions on this blank warehouse item cannot be modified. However, other settings can be updated.
Product information management > Products > Released products > Manage inventory tab, Warehouse group > Warehouse items.

For each warehouse item that you create, you can also select different options for the following:
- Counting group - Determines the frequency of cycle counting.
- Default receipt location - Defines the location that is used by default when the item is received.
- Default issue location - Defines the location that is used by default when the item is delivered.
- Picking location - Defines the default location that the item is picked from.
The Default receipt location, Default issue location, and Picking locations fields are available only when the storage dimension group that is assigned to the item has the Location dimension activated. These fields are also not available for the default blank warehouse item that is created by the system.
Next unit: Set up bar codes
Bar codes can be used for many reasons, such as identifying items or locations. You can set up bar codes on your products in Organization administration > Setup > Bar codes.
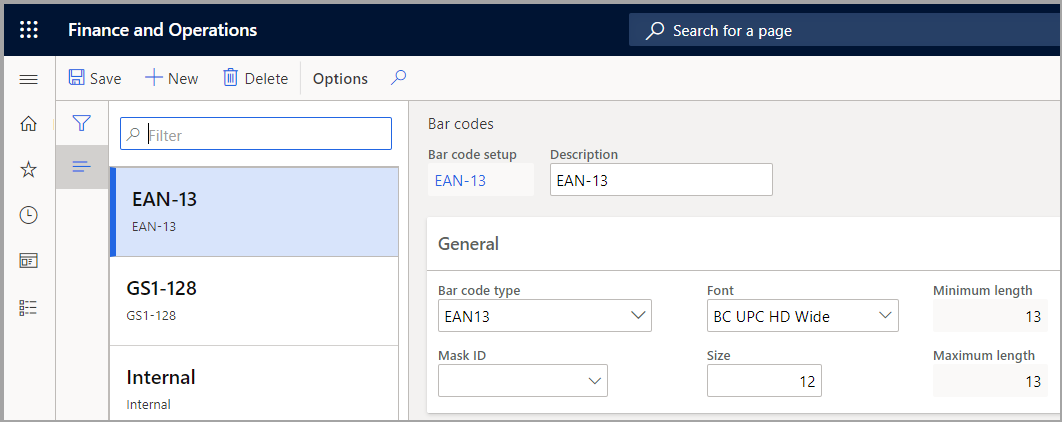
Bar codes can then be printed on various documents or used for scanning products. Before you can set up specific bar codes for a product, you must use the Bar code setup page to define the formats for a specific bar code.
Next unit: Set up default order settings
Order settings can help you set up defaults to use for sales, purchases, and inventory transactions. Master planning uses these settings to generate sales orders, purchase orders, and inventory orders.
The settings are also used when you manually create an order.
The main settings involve the following areas:
- Defining a warehouse to use for each module when orders are created
- Defining the settings that modify order quantities for each module when orders are created
Product information management > Products > Released products > Manage inventory tab, Order settings group, Default order settings

The Working day's option is used for retrieving the arrival handling time on the Arrival overview page.
Next unit: Inventory journals
The inventory journals in Supply Chain Management are used to post physical inventory transactions of various types, such as the posting of issues and receipts, inventory movements, the creation of bills of materials (BOMs), and the reconciliation of physical inventory. All of these inventory journals are used in a similar way, but are divided into different types.
The following types of inventory journals are available:
- Movement
- Inventory adjustment
- Transfer
- BOM
- Item arrival
- Production input
- Counting
- Tag counting
Movement
When you use an inventory movement journal, you can add cost to an item when you add inventory, but you must manually allocate the additional cost to a general ledger account by specifying a general ledger offset account when you create the journal. This inventory journal type is useful if you want to overwrite the default posting accounts.
Watch this video to see a demonstration of the inventory movement journal:
Inventory adjustment
When you use an inventory adjustment journal, you can add cost to an item when you add inventory. The additional cost is automatically posted to a specific general ledger account, based on the setup of the item group posting profile.
Use this inventory journal type to update gains and losses to inventory quantities when the item should keep its default general ledger offset account. When you post an inventory adjustment journal, an inventory receipt or issue is posted, the inventory values are changed, and ledger transactions are created.
Transfer
You can use transfer journals to transfer items between stocking locations, batches, or product variants with and without cost/financial implications, which all depends on the specific transfer journal line and general setup.
For instance, you can transfer items from one warehouse to another warehouse within the same company. When you use a transfer journal, you must specify both the From and To inventory dimensions, for example, for Site and Warehouse.
The on-hand inventory for the defined inventory dimensions is changed accordingly. Inventory transfers reflect the immediate movement of material. In-transit inventory isn't tracked. If in-transit inventory must be tracked, you should use a transfer order instead. When you post a transfer journal, two inventory transactions are created for each journal line:
- An inventory issue at the From location.
- An inventory receipt at the To location.
BOM
When you report a BOM as finished, you can create a BOM journal. By using a BOM journal, you can post the BOM directly. This posting generates an inventory receipt of the product, together with an associated BOM and an inventory issue of the products that are included in the BOM. This inventory journal type is useful in simple or high-volume production scenarios where routes aren't required.
Item arrival
You can use the item arrival journal to register the receipt of items (for example, from purchase orders). An item arrival journal can be created as part of arrival management from the Arrival overview page, or you can manually create a journal entry from the Item arrival page.
If you enable the item arrival journal name to check for picking locations, Supply Chain Management looks for a location for received items and, if there is room, generates location destinations for the incoming items.
Production input
Production input journals work like the item arrival journals but are used for production orders.
Counting
Counting journals let you correct the current on-hand inventory that is registered for items or groups of items, and then post the actual physical count so that you can make the adjustments that are required to reconcile the differences.
You can associate counting policies with counting groups to help group items that have various characteristics so that those items can be included in a counting journal.
For example, you can set up counting groups to count items that have a specific frequency, or to count items when stock falls to a predefined level.
By creating lines on the Tag counting page, you place a tag number on each inventory item, such as a number from 1 to 500.
During the count, you can enter the item number and the quantity on a corresponding tag. This tag can then be used as the basis for input in the tag counting journal. After you post the tag counting journal, a new counting journal is created on the Counting page.
The new journal is based on the tag counting journal lines that you created. To tag-count items by a specific inventory dimension, select the dimension on the Display dimension page that is displayed when you create the tag counting journal.
For example, to count items in a specific warehouse, select the Warehouse check box. If the Lock items during count slider on the Inventory and warehouse management parameters page is selected, items can't be physically updated during counting. However, items in tag counting journals aren't locked during counting. Inventory transactions aren't created until the tag counting lines are posted and transferred to a counting journal. If tags are entered randomly, and you want to identify missing tags, select the Tag column header to sort the lines by tag
Tag counting
Inventory tag counting is mostly used in a retail company. Tag counting journals are used to assign a numbered tag to a count lot. The tag should contain a tag number, item number, and item quantity. To ensure that a tag is used only one time, and that all tags are used, every item number should have a unique set of tags that has its own number sequence. Three status values can be set for each tag:
- Used – The item number is counted for this tag.
- Voided – The item number is voided for this tag.
- Missing – The item number is missing for this tag.
When you post a tag counting journal, a new counting journal is created, based on the tag counting journal lines.
Warehouse management on-hand entries cleanup job
The Maximum execution time for the warehouse management on-hand entries cleanup job feature lets you establish the maximum time allowed for processing the on-hand entries cleanup job. If the job doesn't complete before the specified number of hours, it will save the work completed so far and then exit. This capability is especially relevant for implementations that have high inventory usage. In this case you should schedule the job to run at times when the system is as lightly loaded as possible. Enter a value of "0" (or leave blank) to allow the batch job to continue running until it has finished.
When calculating the on-hand inventory, the number of records in the tables involved influences the queries' performance. One way to improve this performance is to decrease the quantity of records considered by the database.
For items enabled for warehouse management processing, the InventSum and WHSInventReserve tables store on-hand data. Deleting these records can significantly improve on-hand calculations (these are referred to as WHS items.)
The on-hand entries cleanup job deletes any records in the WHSInventReserve and InventSum tables where all the field values are 0 (zero). These records can be deleted because they don't contribute to the on-hand information. The job deletes only records that are below the Location level.
Schedule and configure the cleanup job
The on-hand entries cleanup job is available in Inventory management > Periodic tasks > Clean up > Warehouse management on-hand entries cleanup. To control the scope and schedule for running the job, use the standard job settings. The following settings are also available:
Delete if not updated for this many days – Enter the minimum number of days the job must wait until an on-hand entry that has dropped to zero is deleted. This helps to reduce the risk of deleting on-hand entries that are still being utilized. Either enter 0 (zero) or leave the field blank if you want cleanup to occur as soon as possible.
Maximum execution time (hours) – Enter the maximum cleanup job time in hours. If the job isn't finished before this time passes, it will save the work it's done so far and then closes itself. This capability is particularly relevant for inventory-intensive implementations. You should schedule the clean up when the system load is as light as possible in these cases. If you want the batch job to continue until completed, either enter 0 (zero) or leave the field blank.

While you might be able to run the job during regular business hours, we suggest that you run it outside of work hours. Doing so helps prevent conflicts when a user works with a record that is in the process of being cleaned.
If the job attempts to remove a record for an item that is currently in use, there is a deadlock error for the cleanup job, or if a user attempts to access a record that has already been cleaned then the error message will appear.
When the job runs, the commit size is 100. In other terms, deletions will take place in groups of 100. However, since specific deletions are set-based, there might be cases where the same operation will delete more than 100 records. When this happens, lock escalations may occur. Lock escalations mean that you have too many locks on specific rows in a table. Once you exceed the maximum allowed number of locks by row, the entire table is locked.
Make the Maximum execution time setting available
By default, the Maximum execution time setting isn't available. If you want to use it, you must turn on the system's related feature. Go to the Feature management workspace, and locate it as follows:
- Module- Warehouse management
- Feature name - Maximum execution time for the warehouse management on-hand entries cleanup job.
Next unit: Work with journals
A journal can be accessed by only one user at a time. If several users must access journals at the same time to create journal lines, those users must select journals that aren't currently being used to prevent information from being overwritten. In situations where multiple departments use the same journal type, it's helpful to create multiple journal names (for example, one for each department). It can also be helpful to divide journals so that each posting routine is entered in its own unique inventory journal.
For posting routines that are associated with inventory transactions, create one journal for periodic inventory adjustments and another for inventory counting.
Posting journal lines
You can post the journal lines that you create at any time until you've locked an item from additional transactions. The data that you enter in a journal remains in that journal, even if you close the journal without posting the lines.
Not all inventory journals are OData-enabled; therefore, you cannot use the Excel data connector to get data published, updated, and imported back to Supply Chain Management.
Another difference between the journal data entities is the ability to use composite entities that include both the header and line data. You can use the composite entities for the following:
- Inventory adjustment journal
- Inventory movement journal
The following two inventory journals only support the Initialize stock scenario as part of a data management import project:
- When a journal header number is not specified, but a number sequence is specified for the journal type, the import job will automatically create journal headers per 1000 lines. For example, importing 2020 lines will result in the following three journal headers:
- Header 1: will contain 1000 lines
- Header 2: will contain 1000 lines
- Header 3: will contain 20 lines
- It is assumed that unique line information exists for each inventory dimension, which can be a product, storage, and tracking dimension. Therefore, it’s not possible to import journal lines where only the date field differs on the lines within the same import project.
Next unit: Work with reason codes
Reason codes let you analyze the results of a counting process and any discrepancies that occur during that process. You can specify the reason for doing the count, such as a broken pallet or a stock adjustment that is based on inventory samples.
Before you set up the system, we recommend that you define a strategy for working with reason codes. For example, try to answer the following questions while defining your strategy:
- Should reason codes be mandatory on warehouses?
- Should reason codes be mandatory or optional on some items?
- How many reason codes do you require?
- Do you have to preselect a limited list of reason codes for adjustments?
- How should users of barcode scanners use reason codes? Should the reason codes be preselected, mandatory, or not editable?
- Do warehouse workers require different reason code behavior on mobile scanners? If the answer is yes, you can create more menu items and assign them to different people.
- Should the reason codes drive financial offset account posting?
You can create multiple reason code policies, and each reason code policy can have two counting reason code policies. The counting reason code policies can be used at the warehouse level or the item level.
Warehouse and retail workers making inventory adjustments can select the reason for the adjustment as they work. With a list of possible reasons for adjustment (stolen, expired, or damaged), adjustments can be posted to the appropriate offset account for each reason. This results in the adjustments being automatically posted as a counting journal to the correct account once it's registered.
To set up reason code policies, use the following procedure:
- Go to Inventory management > Setup > Inventory > Counting reason code policies, and create a new reason code policy.
- In the Counting reason code type field, select either Mandatory or Optional to specify whether selection of a reason code should be an optional or a mandatory action in one of the following counting journals:
- Cycle count (mobile device)
- Spot count (mobile device)
- Threshold count (mobile device)
- Adjustment in (mobile device)
- Adjustment out (mobile device)
- Counting journal (rich client)
You can also set up reason codes for individual warehouses and for products. The reason code setup for products can disregard the setup for warehouses.
Mandatory reason codes
If the Mandatory parameter is set in the configuration of reason codes for warehouses or items, the counting journal can't be completed and closed until a reason code is provided.
To set up reason codes for warehouses, use the following procedure:
- Go to Inventory Management > Setup > Inventory breakdown > Warehouses.
- On the Inventory and warehouse management tab, in the Counting reason code policy field, select one of the following options:
- Blank – The parameter that is set up for the item is used to determine whether counting journals are mandatory for the product.
- Mandatory – A reason code is always required on counting journals for the warehouse.
- Optional – A reason code isn't required on counting journals for the warehouse.
To set up reason codes for products, use the following procedure:
- Go to Product information management > Products > Released products.
- On the Product tab, select Counting reason code policy, and then select one of the following options:
- Blank – The parameter that is set up for the warehouse is used to determine whether counting journals are mandatory for the product.
- Mandatory – A reason code is always required on counting journals for the product. This setting overrides any reason code setting at the warehouse level.
- Optional – A reason code isn't required on counting journals for the product. This setting overrides any reason code setting at the warehouse level.
Use reason codes in counting journals
In a counting journal, you can add reason codes for counts of the following types:
- Cycle count
- Spot count
- Threshold count
- Adjustment in
- Adjustment out
Reason codes are added to the journal lines in counting journals of the Counting journal type.
- Go to Inventory management > Journal entries > Item counting > Counting.
- In the line details of the counting journal, in the Counting reason code field, select an option.
To view the counting history as it's recorded by reason codes, go to Inventory management > Inquiries and reports > Counting history and then, in the Counting reason code field, view the counting history that has been recorded through a reason code.

Use a reason code for a quantity adjustment
To add a reason code for a quantity adjustment, use the following procedure:
- On the On-hand inventory page, select Adjust quantity. You can open the On-hand inventory page in several ways. For example, select Inventory management > Inquiries and reports > On-hand inventory.
- Select Adjust quantity and then, in the Counting reason code field, select a reason code.
Consignment inventory is inventory that’s owned by a vendor and stored at your site. When you’re ready to consume or use the inventory, you take over the ownership of it.
Consignment replenishment orders
A consignment replenishment order is a document that you can use to request and keep track of inventory quantities of products that a vendor intends to deliver within a certain date interval by creating ordered inventory transactions.
Typically, this will be based on the forecast and actual demand of the specific products. The inventory that’s going to be received against the consignment replenishment order remains in the ownership of the vendor. Only the possession of the products that are related to the physical receipt update is recorded; therefore, no general ledger transaction updates occur.
The Owner dimension is used to separate information about which inventory is owned by the vendor and which is owned by the receiving legal entity.
Consignment replenishment order lines have an Open order status if the full quantity of the lines has not been received or canceled. When the full quantity has been received or canceled, the status is changed to Completed.
The physical on-hand inventory that’s related to a consignment replenishment order can be recorded by using either a registration process or a product receipt update process. Registration can be done as part of the item arrival process or by manually updating the order lines.
When the product receipt update process is used, a record is made in the Product receipt journal, which can be used to acknowledge the receipt of goods to the vendors.
Inventory ownership change journal
The process of changing the owner of the inventory from the vendor to the receiving legal entity is done by using an Inventory ownership change journal. No expected inventory transactions are created for the journal. The only inventory transactions created are those that relate to a posted journal.
When the journal is posted:
- The vendor-owned inventory is issued by using an Ownership change reference with a Sold status.
- On-hand inventory is received by the legal entity that’s consuming it by using a product receipt updated inventory transaction on the purchase order. This sets the status of the order to Received. Purchase orders that are used for consignment have the Origin field set to Consignment.
- It’s not possible to update the quantity on consignment purchase order lines after the order has been created.
Vendor collaboration in consignment processes
If your vendors are using the vendor collaboration interface of Supply Chain Management, they can use this to monitor the consumption of inventory at your site.
The vendor collaboration interface has three pages that are related to the inbound consignment process:
- Purchase orders consuming consignment inventory - Shows detailed purchase order information that is related to the ownership change from the consignment process.
- Products received from consignment inventory - Shows information about the items and quantities that have product receipts updated during the ownership change process.
- On-hand consignment inventory - Shows information about the consignment items that they are expected to deliver and the items that are already physically available at the customer site.
For more information about vendor collaboration, see Configure and manage vendor collaboration in Dynamics 365 Supply Chain Management.
Tracking dimension group
Items that are going to be used in consignment processes must be associated with a Tracking dimension group where the Owner dimension is set to Active. The Owner dimension always has the Physical inventory and Financial inventory options selected. The Coverage plan by dimension option is never selected.
Item groups
In every legal entity, you must set up at least one item group because it is a prerequisite that will be used in inventory processing.
Item groups are used to manage inventory by dividing inventory items into groups based on item characteristics. You can select main account numbers for the automatic ledger transactions that are generated for item group receipt and issue transactions in inventory. You can also set up demand and supply forecasts for item groups.
Item groups serve three main purposes:
- Defining sets of ledger accounts for accounting entries of a collection of products that are classified in the item group.
- Using item groups to report detailed financial information and queries.
- Creating other reports that are related to products.
To create an item group, go to Inventory management > Setup > Inventory > Item groups. Specify which accounts from the chart of accounts to use for the various account types in each area.

The Sales order FastTab shows the main accounts that are configured for the item group, in addition to the accounting that is related to the sales order document in the revenue cycle.
For products that are configured as stocked products, an inventory transaction is recorded with the sales order line for the ordered quantity.
For example, when a stocked product is delivered for a sales order, accounting entries are generated in the Order, packing slip main account (issue) and Sales, packing-slip offset main account (consumption) fields, if the Post physical inventory check box on Item model groups page and the Post packing slip in ledger option in the Accounts receivable parameters are selected.
The Purchase order FastTab shows the main accounts that are configured for the item group, in addition to the accounting that is related to a purchase order document in the procurement cycle.
For a product that is configured as a stocked product, inventory transactions are generated with the purchase order line for the ordered quantity.
The Inventory FastTab shows the accounts that are used for inventory-related posting for the item group.
For example, the system uses Inventory, fixed receipt price profit and Inventory, fixed receipt price loss account types to post gain or loss for variance to the Fixed receipt price of products that are configured with a Fixed receipt price inventory model in the inventory model group. It also uses Receipt and Issue to post receipts and issue inventory movements for stocked product.
The Production FastTab shows the accounts that are used for manufacturing-related posting for the item group.
The Setup FastTab lets you set up default forecast and tax groups. The Forecast tab contains the Default item allocation key. Select the user-defined allocation key to serve as the proposed standard key when you create forecasts for the item group. Item allocation keys are created in the Item allocation keys setup of the Master planning module.

The Purchase tax and Sales tax groups contain the Item sales tax group field. This is where you specify a default item sales tax group for items in the selected item groups.
Item model groups
Item model groups contain settings that determine how items are controlled and handled upon item receipts and issues. These settings also determine how item consumption is calculated. This feature facilitates maintenance because many items are frequently controlled with the same setup.
You can attach several products to an item model group. Instead of providing detailed information for each item, one item model group collects all the information. This links it to the products in question, and helps make updating easier because you can typically manage several items according to the same setup that only has to be updated in one place. Therefore, you should create item model groups only as needed.
Item model groups are an important part of configuring product for stock, inventory management, and accounting. Item model groups contain settings that determine how items are controlled and handled upon item receipt and issue.
To create an item model group, go to Inventory management > Setup > Inventory > Item model groups.
Item model groups determine the following stock and inventory policies:
- Whether the product is stocked or not stocked
- The cost flow assumption and cost measurement method for valuing inventory of stocked products
- If physical and financial negative inventory is permitted
- If inventory transactions should be posted to the general ledger
- The workflow that is used when you send or receive items
- The reservation rules
An item model group setup is important when you determine how the item will integrate with other areas of Supply Chain Management. Not all fields are covered in this module because they apply to other areas of the system that will be covered in other modules.
Costing method & cost recognition
The Costing method & cost recognition field group determines whether products are tracked in stock.
It contains the Stocked product parameter. If the Stocked product check box is cleared, no inventory-transactions are maintained for the product. Therefore, the product cannot be used for production or inventory-related features. This includes inventory journals that rely on inventory transactions.
The product that is not stocked can be used on sales and purchase orders.

Select the Stocked product check box to indicate that the product should be handled in inventory. Products that are handled in inventory generate inventory transactions. These products can be included in cost calculations. On-hand quantities can also be maintained for these products. Stocked products include items and services.
A service cannot be added to stock. However, the system requires that proforma stock transactions be generated for services that contribute to the inventory value of tangible goods. For example, proforma stock transactions must be generated if a service is used to subcontract production steps.
The following are transactions that are only used for stocked products:
- Production orders
- Transfer orders
- Inventory journals
- Quarantine orders
- Quality orders
- Inventory blocking
- Inventory forecasting
If an item model group is set up for a product that is not stocked, many of the parameters are irrelevant.
Ledger integration
The Ledger integration field group determines whether inventory transactions are to be posted to the general ledger, physically or financially, and when they must be posted. The fields in this group are as follows:
- Post physical inventory
- Post financial inventory
- Post to deferred revenue account on sales delivery
- Accrue liability on product receipt
Post physical inventory
The following list explains the effect of the Post physical inventory parameter when it is selected or cleared:
- If this field is selected, physical movements of stocked products are posted in the ledger if:
- On sales delivery, when the Post packing slip in ledger parameter is selected on the Accounts receivable parameters page.
- On product receipt, when the Post product receipt in ledger parameter is selected on the Accounts payable parameters page.
- On production report as finished, when the Post report as finished in ledger is selected on the Production control parameters page.
- If you select the Post physical inventory parameter, packing lists from purchases or sales are posted at cost in the ledger. This means that the value of physically received, delivered, or floating items is not only reflected in the inventory, but also in the ledger. When the same purchase or sales invoice is updated, the transactions are reversed from the packing slip update.
- If you clear the Post physical inventory parameter, physical movements of stocked products are not posted in the ledger, regardless of whether the Post packing slip in ledger, Post product receipt in ledger, and Post report as finished in ledger setup options are selected in the accounts receivable, accounts payable, and production control parameters.
Post financial inventory
The following list explains the effect of the Post financial inventory parameter when it is selected or cleared:
- If this field is selected, the updated financial value of items is posted in the ledger when:
- A purchase order is invoice-updated. The product expenditure is posted to the inventory receipt account.
- A sales order is invoice-updated. The cost of the product is posted to the inventory issue and consumption accounts.
- If you clear this parameter, purchases are posted to the item purchase expenditure for the expense account when the purchase is matched to a vendor invoice.
The inventory value that is posted can then be reconciled with the related status accounts in the general ledger.
If this option is cleared, when a purchase order is invoice-updated, the value of the items is posted to the item consumption account, but not to the inventory receipt account. When a sales order is invoice-updated, no posting occurs in the item consumption account or the issue account. Clear this option for service items if the item consumption should not be posted when sales orders are invoiced. When this option is cleared, journal lines for the items do not generate ledger postings.
Post to deferred revenue account on sales delivery
Select the Post to deferred revenue account on sales delivery parameter to post the expected revenue on sales delivery. This is typically used when a company recognizes revenue at the time of shipment instead of at the time of billing the customer. When the order is invoiced, the accounting entries for deferred revenue are relieved.
Select this option to accrue the estimated revenue for the delivered quantity of packing slip updates. The accrued revenue that is accounted on the sales delivery is offset when the customer is invoiced for the delivery.
Accrue liability on product receipt
Select the Accrue liability on product receipt parameter to post the expected expenditure and liability for purchase for packing slip updates to the general ledger. When the product receipt is matched to vendor invoice, the accounting entries for accrued liability are relieved.
Include physical value
Select the Include physical value option to indicate that transactions that are physically updated should be included in the calculation of the average cost. At inventory close, this parameter can be used, depending on the method that is used for inventory valuation. The following inventory valuation methods use this parameter during inventory close:
- FIFO
- LIFO
- LIFO date
The following inventory valuation methods do not use this parameter during inventory close:
- Weighted avg.
- Weighted avg. date
Fixed receipt price
Select the Fixed receipt price option to adjust issues and receipts to a fixed receipt price. The fixed receipt price is a principle for inventory valuation that sets the price of receipts to the active planned cost or basic cost of a product.
The fixed receipt price is defined in the Price field on the Manage costs tab on the Released product details page.
When this option is selected, receipts and issues are posted as follows:
- For purchase receipts, posting occurs at the actual cost.
- For purchase invoices, the price difference between the actual cost and the fixed receipt price is posted to the general ledger as a variance.
- The amount is posted to the loss or profit account for the fixed receipt price.
- Inventory is updated based on the fixed receipt price.
- For sales order packing slips and sales invoices, posting occurs at the estimated cost.
When you run an inventory close or a recalculation, if the Fixed receipt price option is selected, the value of issue transactions is adjusted according to the price that is specified in the Price field. If the Fixed receipt price option is cleared, the value of issue transactions is not adjusted according to this price.
If the fixed receipt price is changed, and you want all new issue transactions to use the new cost, follow these steps:
- Run an inventory close.
- Adjust the balance for the on-hand inventory so that the balance matches the new cost.
- Activate a new planned cost.
Inventory model
Select the inventory model that is used to close and perform adjustments on the Closing and adjustment page.
Next unit: Configure inventory policies
The Negative inventory field group determines whether physical or financial negative inventory will be permitted. It contains the following two parameters:
Physical negative inventory - Select this check box to enable the system to issue an item from inventory, even though stock levels are insufficient. This parameter is sensitive for inventory value calculation. The decision whether to select or clear this parameter must be taken with the utmost care to prevent incorrect use of the functionality.
Example: There is usually a time lag between arrival of items in the warehouse and when the purchasing department updates the received item's product receipts. When you visit the warehouse, you notice that the items have arrived for your purchase order, even though it is not a part of your warehouse in the system.
If the item's item model group has Physical negative inventory selected, you can deliver the item, even if it has not yet been registered as being physically present in the inventory.
Financial negative inventory - When this check box is cleared, you are prohibited from issuing quantities from stock, although physically available, if there are insufficient quantities that are financially updated, on-hand inventory for the item.
When this field is selected, negative financial inventory is enabled, and the user can issue quantities from stock and inventory without knowing the real cost price. The invoice of these items might be posted after the items are sold, and then an inventory closing must adjust the cost to actual cost.
If the check box is selected and you are using an actual costing approach, you should also enter a cost on the item, to temporarily value the issue, until adjustment to actual cost can be made. Enter the cost price in the Cost price field on the Manage cost FastTab on the Released products page.
Quarantine management
Select the Quarantine management check box to indicate that products linked to this group are under quarantine management rules and requirements. This option is used for items that are set aside and awaiting approval for reception into the physical inventory and distribution.
If the check box is clear, items will not be under quarantine management unless a quarantine order is created manually. When the item is physically updated, a quarantine order is generated with the status of Started.
Physical update field group
Fields in the Physical update field group determine the workflow that is used when you send or receive items and you use them to set rules around how an order is handled for receiving and shipping. The Physical update field group contains the following parameters:
Registration requirements - By selecting this check box, the user must register the receipt before inventory is updated through the product receipt on a purchase order. Register a product to record the item's physical presence at the company. These products are a part of the physical warehouse on-hand. However, the cost will not be updated until they are physically updated with a product receipt update. Generally, this option is used with the Warehouse management functionality.
- Example: Select the Registration requirements parameter to monitor the vendor performance or the reception of goods into the company. In this case, you must monitor the goods when they arrive at the company.
Receiving requirements – When this check box is selected, item receipts must be physically updated before they can be financially updated. A product receipt must be entered and posted before the corresponding vendor invoice can be posted. If there is a difference between the received quantity on the product receipt and the invoiced quantity on the invoice, an icon is shown in the Product receipt quantity match field on the Vendor invoice page.
Picking requirements - When you select this check box, item issues must have the status of Picked before inventory is physically updated. Select the Picking requirements parameter with the warehouse management functionality when you use location management on the item and when shipments are collected by using picking routes.
Deduction requirements - When you select this check box, item deductions must be physically updated before they can be financially updated for both inbound and outbound.
- Inbound - A product receipt must be entered and posted before the corresponding vendor invoice can be posted. If there is a difference between the deducted quantity on the product receipt and the negative invoiced quantity on the invoice, an icon is shown in the Product receipt quantity match field on the Vendor invoice page.
- Outbound - A packing slip must be entered and posted before the corresponding customer invoice can be posted. If there is a difference between the deducted quantity on the packing slip and the negative invoiced quantity on the invoice, an icon is shown in the Product receipt quantity match field on the Customer invoice page.
Reservation field group
The Reservation field group contains the following parameters:
- FIFO date-controlled - If you select the FIFO date-controlled option, the inventory reservation is controlled by a sorting date according to the FIFO principle. Batches are reserved based on the earliest date of receipt of items, according to the principle of first in, first out (FIFO).
- Backward from ship date - This option becomes available if you have selected the FIFO date-controlled option. If you select Backward from ship date, the inventory is reserved backward from the desired ship date according to the principle of last in, first out (LIFO). If no receipts are available before the ship date, a FIFO reservation is used.
- Item sales reservation - Determines whether item reservation is manual or automatic. If a reservation is automatic, inventory is reserved when order lines are created. It’s possible to make reservations at the item number level for BOMs (Automatic option), or for the individual elements of a BOM (Explosion option). The default value for Item sales reservation can be inherited from the Accounts receivable parameters page. On that page, the value is set in the Reservation field in the Sales default values section on the General tab.
- Same batch selection - Same batch selection lets you reserve inventory for a sales order line against a single batch of inventory. If you want to use this option, you must also set the Consolidate requirement option to Yes. Additional settings are required for the tracking dimension group and storage dimension group.
- Consolidate requirement - This option is like the Same batch selection option, and it consolidates inventory that’s reserved for sales order lines into a single requirement.
- FEFO date-controlled: Known as first-expired-first-out, this option allows you to reserve batches that are close to their expiration date or best before date. You also need to set the Pick criteria field to select either Expiration date or Best before date.
- Pick criteria: Select the option that determines the date for master planning calculations and reservation logic. This date is an internal setting that decides whether an inventory batch can be used.
When you select these parameters for the item model group, you determine how Supply Chain Management makes reservations of the type Automatic, where no on-hand inventory or receipts with the Received or Invoiced status exist for the item, however, there are receipts with the Ordered status for the item.
Additionally, for these parameters to come into effect, the Reserve ordered items check box must be selected in Inventory and warehouse management > Setup > Parameters > General tab.
Inventory model
The inventory model determines both the cost measurement method (standard costing or actual costing) and the cost flow assumption under actual costing for valuing inventory. When you are using actual costing, the inventory closing function will adjust the estimated cost according to the rules of the selected inventory model. The choices are as follows:
- FIFO
- LIFO
- LIFO date
- Weighted avg.
- Weighted avg. date
- Standard cost
- Moving average
Next unit: Inventory closing and adjustment
As part of the process to settle issue transactions with receipt transactions, you can also select to have the general ledger updated to reflect the adjustments that have been made.
The inventory close process settles issue transactions to receipt transactions, based on the inventory valuation method that is selected in the item’s item model group. As part of the settlement process, you can specify that the general ledger should be updated so that it reflects the adjustments that have been made. However, until inventory close or recalculation has been run, issue transactions are posted at the calculated running average cost price.
After inventory close, you can no longer post in periods that are before the inventory closing date that you set, unless you reverse a completed inventory close process. For example, if inventory close is run for the period that ends on January 31, you can't post transactions that have a date of January 31 or earlier.
Items in inventory are assigned to one of two inventory types: item or service. Inventory close performs the same functions for both types. However, for service items, inventory close still settles issues to receipts.
How often the inventory close process is run varies by company. However, transaction volume should help determine how often you decide to run inventory close. In general, most companies run inventory close as part of their month-end close and reconciliation procedures.
Go to Inventory management > Periodic tasks > Closing and adjustment to perform the inventory close process.
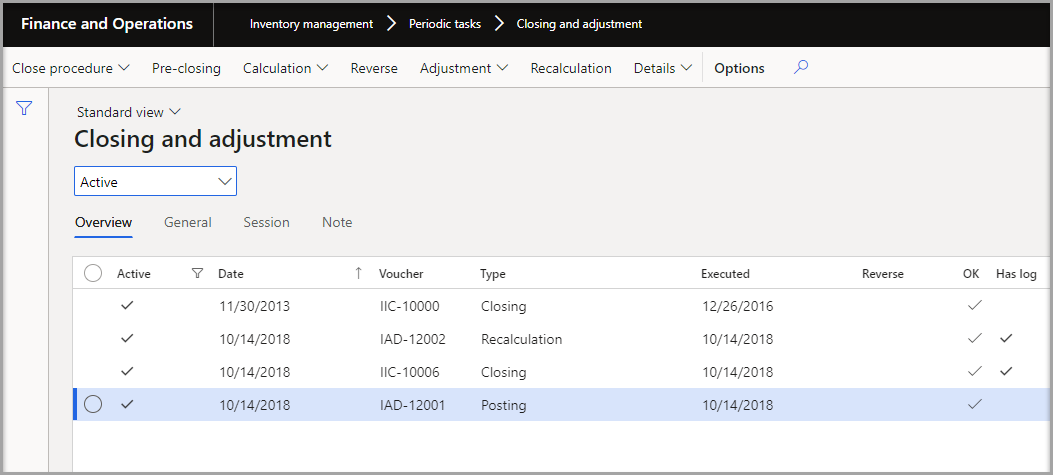
Inventory recalculation and the general ledger
If adjustments to inventory and the general ledger are required during a month or other inventory period, you can run inventory recalculation instead of inventory close. Inventory recalculation makes adjustments but doesn't make settlements to inventory transactions.
During inventory recalculation, on-hand inventory is adjusted, inventory transactions are adjusted, and inventory recalculations and inventory closes are run. These tasks affect any ledger account that is linked to the original inventory transaction.
For example, when you create a purchase order from a sales order, the general ledger accounts that are used for the original sales order are updated. Even if the ledger accounts for the item group that is assigned to the item were changed after the sales order was posted, and an inventory recalculation created an adjustment amount, the adjustment amount is posted to the original ledger accounts. The adjusted amount isn’t posted to the new ledger accounts that are assigned to the item.
After the update is completed, you can review the ledger voucher that is posted by following these steps:
- On the Closing and adjustment page, on the Overview tab, select the update to review.
- Select Details and then select Voucher.
Effects of the inventory close process on the general ledger
Several of the tasks that you can perform on the Closing and adjustment page cause an update to general ledger.
For example, the general ledger is updated when you make inventory on-hand adjustments, make inventory transaction adjustments, run inventory recalculation, and run inventory close.
The ledger accounts that are updated because of these tasks are linked to the original inventory transaction.
For example, if a sales order is settled to a purchase order, the general ledger accounts that were used for the original sales order are adjusted. This behavior occurs even if the ledger accounts for the item group that is assigned to the item have changed since the sales order was posted.
After inventory close creates a settlement amount, the settlement amount is still posted to the original ledger accounts, not to the new ledger accounts that are assigned to the item. The general ledger might also be updated if you reverse an inventory close.
Consider the following about inventory close:
- Inventory close isn't required if you use the Standard cost valuation method.
- Before you run the closing procedure, you can view a list of items that can't be settled during the update.
- We recommend that you run inventory close during off-peak hours to distribute computing resources more evenly.
The inventory close log
After the inventory close process has been completed, a message in the message center might inform you that a unit cost price might be incorrect because a transaction could not be fully settled.
Before this message is shown, the system reports the item number and the affected transaction. The message informs you that the cost amount that is used for this transaction wasn't updated because of the inventory close. This message appears when a transaction of the issue type can't be settled.
During the inventory close process, the system checks each financial dimension to determine whether there are more issues than receipts up to the specified closing date. This type of imbalance can occur when an inventory transaction from a purchase order isn't fully posted financially, either because the vendor invoice hasn't been received, or because bill of materials (BOM) components that are included in a production on a higher level aren't financially posted. (The sub-production isn't cost-calculated.) In this case, the subsequent close won't adjust all issues to the correct cost price because not enough receipt information is available.
For each run of the closing procedure, the system indicates whether a log that contains the warnings is stored and can be viewed.
If you receive many warnings in the message, we recommend that you perform the following actions:
- Update receipts financially.
- Advance the closing date.
- Reevaluate the business procedures.
In some circumstances, you might not be able to do anything about the warnings. For example, if marking is used, and the marked purchase order has a financial date that is after the closing date, the closing date can't be changed.
Reversing a completed inventory close
Occasionally, you might have to reverse a completed inventory close to return settlements to the state that they had before adjustments were made. When you reverse a completed inventory close, inventory is reopened to enable posting in the period that the inventory close covers. Related changes might also be made in the general ledger. After you've finished making adjustments, you can run inventory close again for the period that you're working with.
Only the last inventory period that was closed can be reopened. To reverse an earlier inventory close, you must reverse each subsequent inventory close one at a time, starting with the most recent close.
Adjust on-hand inventory cost values
You can use the Adjustment of on-hand inventory page to adjust the cost value of on-hand inventory quantities after an inventory close process is run.
Example: You have the following transactions in February:
- February 1: An inventory financial receipt for a quantity of 2 at a cost of USD 10.00
- February 5: An inventory financial receipt for a quantity of 1 at a cost of USD 13.00
- February 19: An inventory financial issue for a quantity of 1 at a running average cost of USD 11.00
This item was set up with the first in, first out (FIFO) inventory model, and inventory close was performed as of February 28. The financial issue transaction of USD 11.00 will be settled against the financial receipt that is dated February 1, and an adjustment of USD 1.00 will be made. The following inventory receipts will then contain open inventory quantities:
- February 1: A quantity of 1 at a cost of USD 10.00
- February 5: A quantity of 1 at a cost of USD 13.00
To set the cost of these two items to USD 15.00, use the on-hand adjustment option to adjust the open on-hand quantities as of the last inventory close period. Note: The posting date of the on-hand adjustment transaction will be the date of the last inventory close. This date can't be modified.
To open the Adjustment of on-hand inventory page, on the Closing and adjustment page, select the record of a completed inventory close process, and then select Adjustment > On-hand.
Next unit: Archive inventory transactions
Over time, the Inventory transaction table grows exponentially and consumes storage space, which gradually results in performance issues when running queries against the table. To avoid these performance issues, Supply Chain Management has an optional feature, that archives inventory transaction data. When the transactions are archived, both inventory issue and inventory receipt transaction are moved to separate summarized tables.
Before you archive inventory transactions, you should consider the following business scenarios, because they will be affected by the operation:
- When you audit inventory transactions from related documents, such as purchase order lines, the transactions are archived. To access the archived transactions, go to Inventory management > Periodic tasks > Clean up > Inventory transactions archive.
- You cannot cancel inventory closing for archived periods. Before you can cancel an inventory closing, you must reverse the relevant period’s inventory transaction archive.
- You cannot run standard cost conversion for archived periods. Before you can do standard cost conversion, you must reverse the inventory transaction archive for the relevant period.
- Inventory reports that are sourced from inventory transactions will be affected when inventory transactions are archived. These reports include the inventory aging report and inventory value reports.
- Inventory forecasts may be affected if they are run during the time horizon of archived periods.
After you enable the Inventory transaction archive feature in the Feature management workspace, the following criteria must be met prior to archiving transactions:
- The ledger period must be closed.
- Inventory closing must be run on or after the to-period date of the archive.
- The period must be at least one year before the from-period date of the archive.
- There must not be any existing inventory recalculations.
To archive inventory transactions, follow these steps:
- Go to Inventory management > Periodic tasks > Clean up > Inventory transaction archive. The Inventory transactions archive page appears and shows a list of archived process records.
- On the Action Pane, select Inventory transactions archive to create an inventory transaction archive.
- In the Inventory transactions archive dialog box, on the Parameters FastTab, set the following fields:
- From date in closed ledger period – Select the earliest transaction date to include in the archive.
- To date in closed ledger period – Select the latest transaction date to include in the archive.
Note
Only periods that meet the prerequisites will be available for selection.
- On the Run in the background FastTab, set up batch processing details as you require. Follow the usual steps for batch jobs in Supply Chain Management. See Set up batch jobs in Finance and Operations apps if you want to learn more about batch jobs.
- Select OK. You receive a message that prompts you to confirm that you want to continue.
- Read the message carefully, and then select Yes if you want to continue.
- You receive a message that states that your inventory transactions archive job has been added to the batch queue. The job will now start to archive inventory transactions from the selected period.
To learn more about how to archive inventory transactions, see Archive inventory transactions.
Next unit: Work with reason codes for inventory counting
Reason codes help you break down the results of a counting process and any differences that may occur and make any necessary adjustments during the process. For example, the adjustment functionality can be used to post on-hand inventory adjustments to the appropriate accounts based on the reason code.
Set up reason codes
The following procedures describe how to set up reason codes.
Set up reason code policies
To set up reason codes policies, follow these steps.
- In the Feature Management workspace, check to make sure Post on-hand adjustments using configurable reason codes connected to offset accounts feature is enabled.
- Go to Inventory management > Setup > Inventory > Counting reason code policies.
- On the Action Pane, select New to add a policy to the grid.
- Set the Name field for the new policy.
- In the Counting reason code type field, select either Mandatory or Optional to specify whether select of a reason code should be optional or mandatory in one of the following inventory adjustment processes for:
- Mobile device - Cycle count, Spot count, Threshold count, Adjustment in, Adjustment out
- Rich client - Counting journal, Quality adjustment/Online counting
Assign counting reason code policies to products
To assign counting reason code policies to products, follow these steps.
- Go to Product information management > Products > Released products.
- Select a product in the grid.
- On the Action Pane, on the Product tab, in the Set Up group, select Counting reason code policy.
- In the Assign counting reason code policy drop-down dialog box, select a name that has a policy of Optional or Mandatory.
Set up counting reason codes
To set up counting reason codes, follow these steps.
- Go to Inventory management > Setup > Inventory > Counting reason codes.
- On the Action Pane, select New to add a row to the grid.
- Set the Counting reason code and Description fields for the new row.
- To assign an offset account, enter or select a value in the Offset account field. If selected, the value is posted to the offset account instead of the default inventory posting profile account.
Set up counting reason code groups
Counting reason code groups can be used in the Warehouse Management mobile app's Adjustment in and Adjustment out menu items to narrow down the list of counting reason codes. To set up counting reason code groups, follow these steps.
- Go to Inventory management > Setup > Inventory > Counting reason code groups.
- On the Action Pane, select New to add a group.
- Set the Counting reason group and Group description fields for the new group.
- On the Action Pane, select Save.
- In the Details section, select New on the toolbar to add a row to the grid. Then set the Counting reason code field for the new row.
- Repeat the previous step to assign more codes as required. If you must remove a code from the group, select it, and then select Delete on the toolbar.
Set up mobile device menu items for a counting process
To set up mobile device menu items for a counting process, follow these steps.
- Go to Warehouse management > Setup > Mobile device > Mobile device menu items.
- Select the relevant menu item in the List pane or create a new menu item.
- On the Action Pane, select Cycle counting.
- In the Default counting reason code field, set the default reason code that should be recorded when the mobile device menu item is used to do counting.
- In the Display counting reason code field, select one of the following values:
- Line – Show the reason code after each variance is recorded.
- Hide – Don't show the reason code.
- Set the Edit counting reason code to Yes to allow the worker to edit the reason code when shown on the mobile device during counting. Set it to No to prevent the worker from editing the code.
Set up mobile device menu items for adjustment in and adjustment out
To set up mobile device menu items for adjustment in and adjustment out, follow these steps.
- Go to Warehouse management > Setup > Mobile device > Mobile device menu items.
- On the Action Pane, select New to create a menu item.
- Set the Mobile item name and Title fields for the new menu item.
- Set the Mode field to Work.
- Set the Use existing work option to No.
- In the Work creation process field, select Adjustment in or Adjustment out.
- On the General FastTab, set the following fields. (All these fields are added when you select Adjustment in or Adjustment out in the Work creation process field.)
- Use process guide – If you're creating an Adjustment out process, be sure to set this option to Yes. If you're creating an Adjustment out process, this option is always set to Yes.
- Default counting reason code – Set the default reason code that should be recorded when the mobile device menu item is used to do counting.
- Display counting reason code – Select one of the following values:
- Line – Show the reason code after each variance is recorded.
- Hide – Don't show the reason code. -Edit counting reason code – Set this option to Yes to allow the worker to edit the reason code when it's shown on the mobile device during counting. Set it to No to prevent the worker from editing the code.
- Counting reason code group – Select a reason code group if you want to limit the list of options that is presented to workers.
Use counting reason codes
Reason codes are recorded when the Warehouse Management mobile app is used. Therefore, reason codes are instantly used in the counting journal posting unless a counting approval process has been defined.
Modify reason codes for cycle count approvals
To modify reason codes for cycle count approvals, follow these steps.
- Go to Warehouse management > Cycle counting > Cycle count work pending review.
- Select a cycle count in the grid.
- On the Action Pane, on the Work tab, select Cycle counting.
- Then, in the Reason code field, select a new reason code.
Reason codes are added to the journal lines in counting journals of the Counting journal type.
- Go to Inventory management > Journal entries > Item counting > Counting.
- In the line details of the counting journal, in the Counting reason code field, select the reason code that matches your current situation.
View the reason codes recorded in the counting history
To view the reason codes recorded in the counting history, follow these steps.
- Go to Inventory management > Inquiries and reports > Counting history.
- Select an item count record in the list pane.
- In the Counting reason code field, view the counting history that has been recorded through a reason code.
Use reason codes for quantity adjustment or online counting
To Use reason codes for quantity adjustment or online counting, follow these steps.
- Go to Inventory management > Inquiries and reports > On-hand list.
- On the Action Pane, select Quantity adjustment.
- In the Counting reason code field, select a reason code


Good Post.Thanks for sharing this post.
ReplyDeleteDevOps Training
DevOps Online Training