Vendor Prepayment Functionality
Vendor Prepayment Functionality
Posted: March 26, 2017 in Accounts PayableTags: account payable, AX 2012 vendor invoices, payable invoices, prepayment, prepayment invoice, vendor invoice, vendor prepayment, vendor prepayment invoice
The primary objectives to have an ERP (Enterprise Resource Planning) application in the company is to manage and control its resources in organization. Vendor’s prepayments are common or a normal practice in daily business where some vendors request a prepayment (amount/percentage) before shipping the goods or services. MS Dynamics AX 2012 covers this business needs by offering Vendor Prepayment Function, you can track prepayments by defining the prepayment on a purchase order. Vendors can also create a prepayment invoice that is associated with a purchase order, this function was not covered in the previous versions of MS Dynamics AX.
Following are the steps involved with configuring and processing a prepayment for a purchase order, which include the following:
- Prepayment Configuration.
- Create the purchase order.
- Set up the prepayment.
- Post the prepayment.
- Make a payment.
- Settle the payment against the final invoice.
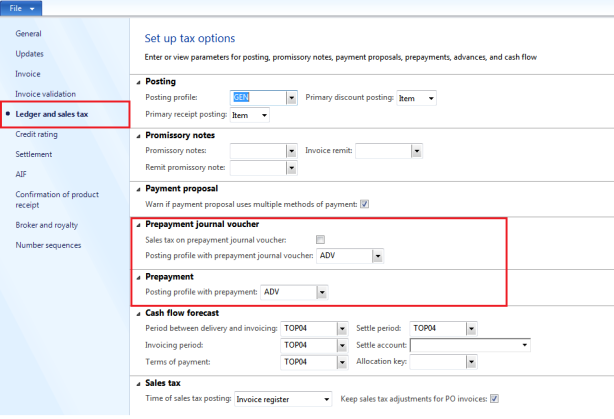
Prepayment Configuration
Vendor Posting Profile
Creates the vendor posting profiles, and assign ledger accounts which will be affected when posting vendor prepayment invoice, prepayment payment, and vendor invoice. In my examples, I have defined on as per my vendor groups:
Navigation: Accounts Payable/Setup/Vendor posting profile

Accounts Payable Parameter
Assign the default vendor posting profiles
REPORT THIS AD
Navigation: Accounts Payable/Setup/Accounts Payable parameters
Procurement Category
Create the procurement categories for the prepayment, in my example my prepayments are identifies as the local and foreign.
Navigation: Procurement & Sourcing/Setup/Categories/Procurement Categories

Inventory posting profile
Here identify ledger accounts which will be affected when prepayment transaction occurred for a specific item category, in my example, as I am using two type of prepayments:
Navigation: Inventory & Warehouse management/Setup/Posting/Posting

Create the Purchase Order
The very first step is to create the purchase order. Take a look at Figure 1 to see an example of a created purchase order.
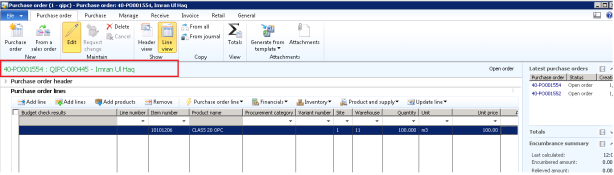
Figure 1: Here is an example of a purchase order (so for example, 40-PO001555 of 10,000 QAR is set up for Vendor QIPC-000446).
Set up the prepayment
After a purchase order is created, you must then set up the prepayment that will be associated with it. To do that, click on the Purchase tab from the menu bar, and then click Prepayment.

After clicking Prepayment, a window will pop up, asking for you to enter details regarding the prepayment. In the Description field, enter the description of the prepayment that you’re creating, and then click the prepayment basis that you wish to apply.
With the prepayment basis, you have two options: Fixed or Percent. With the fixed option, you can apply a fixed amount that you wish to apply to the purchase order amount.
We have entered 10% as the percent value, so 10% of the purchase order will be applied as prepayment. As you can see, the system calculates the 10%, showing the prepayment as 1,000, which is of course 10% of the total 10,000 purchase order amount.
After you define your prepayment values, enter a “Prepayment Category ID” from the dropdown, here in the category we have two option:
- Advances to Suppliers – Local (Mapped with ledger account 1133021)
- Advances to Suppliers – Foreign (Mapped with ledger account 1133022)
**Based on the supplier select the Prepayment Category ID.
If after creating a prepayment you decide you don’t want to apply it to the purchase order, you can remove it by simply selecting the Remove Prepayment option

After you have configured the prepayment you wish to apply to the purchase order, confirm the order by clicking the Confirm option.
Note: Following I have defined the field name and their descriptions
| Field | Description |
| Description | Enter a brief description for the prepayment. |
| Fixed | Select this option if the prepayment has a fixed amount. |
| Percent | Select this option if the prepayment amount is a percentage of the total purchase order amount. |
| Value | Enter the amount of the prepayment as a fixed amount or a percentage of the total purchase order amount. |
| Limit | The maximum amount to be paid to the vendor as a prepayment for the purchase order. |
| Prepayment remaining | The amount of the prepayment that is still owed to the vendor. This amount is the prepayment limit minus the prepayment amount that was already paid to the vendor. |
| Prepayment application remaining | The amount of the prepayments that have been paid but not yet applied against vendor invoices. |
| Currency | The code of the currency that will be used for this transaction. The currency code is associated with the vendor account and is copied automatically when the purchase order is created. |
| Prepayment category ID | Select the procurement category for the prepayment. |
Post the prepayment
After you set up the prepayment basis toward a particular purchase order, you can then post the prepayment. To do that, go to the Purchase Order header, then to the Invoice option, and click Prepayment Invoice.

After clicking the Prepayment Invoice, enter the invoice number and description and post the prepayment invoice.

Once the prepayment invoice is posted, check to make sure that the vendor transaction and vendor balance reflect the prepayment invoice transaction.


Make a payment
After creating the prepayment and posting the prepayment invoice, it’s now time to make a payment. To do so, first create a Payment Journal, mark the prepayment amount, create the check and then post the journal, like normally you are doing in payment processing.
At this stage, after posting the payment it is important to also check the vendor transactions and vendor balance (to ensure that everything continues to match up correctly).

Settle the payment against the final invoice
The final step of the prepayment process is to settle the payment against the final invoice. To accomplish this, first go to Purchase Order and Receive the Products, and then go to the Invoice Register, register your invoice (by full value including the advance, as per the example invoice register will be of 10,000) as normal when you reaches the invoice form, Click Apply Prepayment

REPORT THIS AD
After clicking Apply Prepayment, a screen will open to show the prepayment amount that can be applied to the Invoice Amount (of the purchase order). The “Available application amount” field indicates the prepayment amount.

Then select the prepayment to be applied (or if you’ve set up multiple prepayments, you can select those as well), and then click Apply Prepayment.
Note: Amount can also be partially be selected, for example if you want to settle 500 only, then go to “Amount to apply” and change to 500.
After applying the prepayment, you can see the extra line for the prepayment deduction (Click on edit and check), then click on “Invoice Details close” and click on Post and post the invoice.

After the prepayment has been applied and invoice posted, check the open transaction that still needs to be paid to the vendor, and confirm the amount. In our case, since we applied a prepayment that is 10% of our 10,000 purchase order (which equals 1,000), we see that we still owe 9,000 on the purchase order after our prepayment (10,000 – 1,000 = 9,000).
At last don’t forget to check the transaction and the balance of the vendor on the vendor form.
User forget to apply the Prepayment on final invoice
If the user forget to apply the vendor prepayment invoice then AX will pop up an info log

Now MS Dynamics AX 2012 gives an option to apply the vendor prepayment invoice on vendor account after posting PO invoice
Go to vendor code on All vendor list, select vendor, select Invoice tab, and click on “Apply”, window will open where you need to select the Invoice where you want to apply the prepayment, select and “Apply prepayment”

System will pass the financial entry in the same invoice by adding the two line with following entry:
Dr. Vendor Account
Cr. Advance account
Which is the reverse entry for the prepayment.
Note: While applying the prepayment from the vendor, period should be open in which the final invoice was posted, as the system will post the entry in the same invoice, same date.


Comments
Post a Comment